|
While most core training programs emphasize on strengthening the abdominal muscles, not enough importance is given to stretching and maintenance of mobility or flexibility. A good program for healthy population will involve both stretching to maintain flexibility and mobility as well as contraction of muscles and soft tissue to maintain stability and strength. This gives a wider range of movement to work with at the same time providing a stable spine and trunk on which these movements will be based.
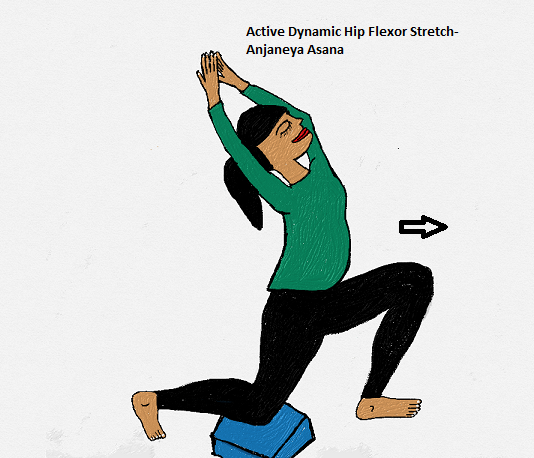
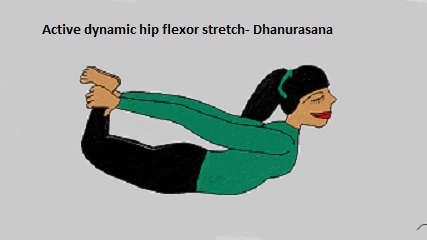
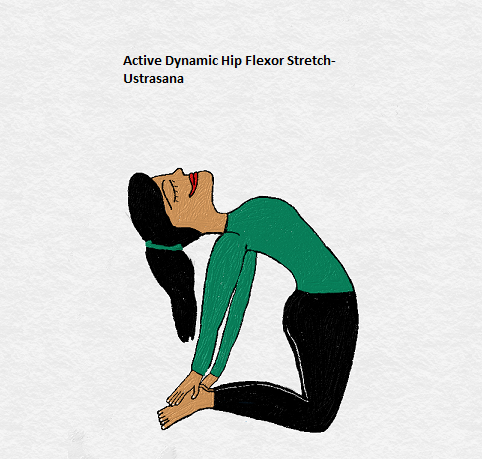
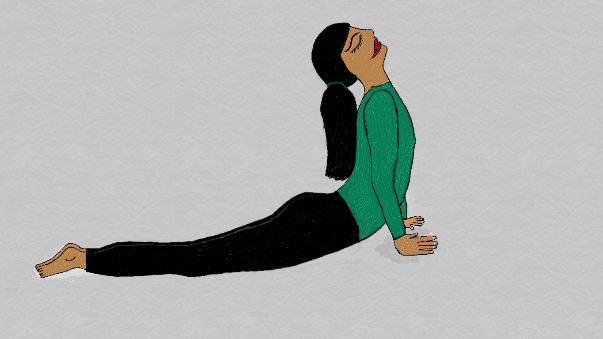
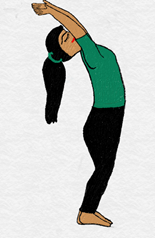
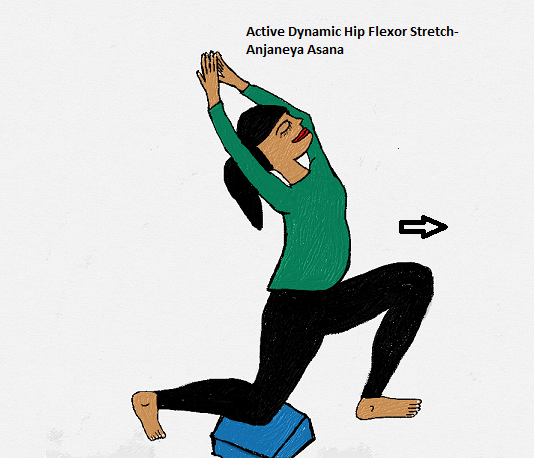
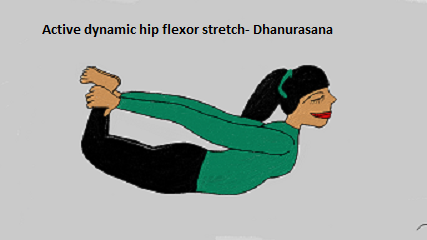
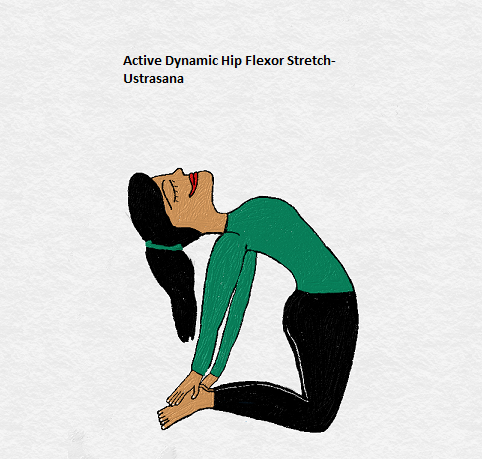
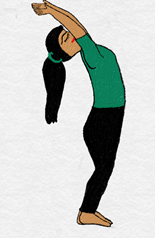
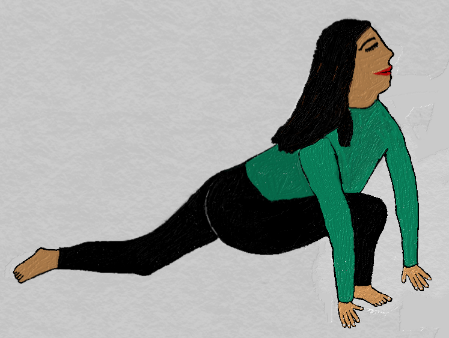
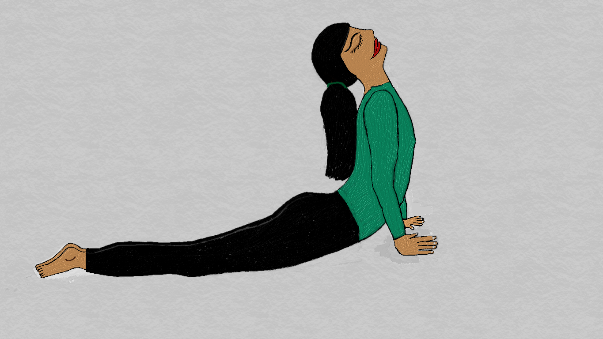
This brings to forefront the issue of what exercise program to follow: traditional yoga, traditional Pilates, or contemporary exercise regimes (walking, running, bicycling, and swimming, engaging in sports)? Well, worry not, choose what you may, physical therapy is here to the rescue. Imagine your work out to be a multi layered complex movement pattern. Physical therapists can peel these down to the basic movement patterns involved (view from the ground-up or inside-out) in any activity. If the base pattern is flawed, the movements imposed on the base patterns will follow suit. Consider a building standing on a foundational block which is stable and sturdy- the building structure it supports will be strong and stable as well. Since physical therapy considers movement patterns and biomechanics, it is a precise science which may be used to reproduce the movement patterns and eventually automatize the healthy movement patterns till it becomes habit. Having said that, let’s get back to the anterior torso stretch; we will look at all the structures that are involved when the trunk is stretched namely: i) the muscles and tendons like the iliopsoas in hip and lumbar spine region, abdominals (rectus abdominis and obliques in lower to mid trunk), the pectorals and serratus anterior in the chest together with the intercostal muscles, deltoid in the shoulder region, and the sternocleidomastoid and deep neck flexors in the cervical spine/neck region ii) ligaments, like the anterior longitudinal ligament (ALL) which runs along the front of the vertebral bodies iii) fascia, like the aponeurosis of the insertion of transversus abdominus and obliques, linea alba iv) dermal tissue (skin). Various soft tissues have varying elastic properties and stretches must be performed gently and over prolonged periods to achieve flexibility. The anterior torso is stretched through backward bends. These stretches are active stretches and have been considered in various other posts. I will group them here for a clear understanding of anterior torso stretch. Active Dynamic Stretches for Anterior Torso There are several yoga asanas that stretch the hip flexors and the anterior torso. These asanas are intermediate to advanced level as they entail nuances in muscle control, and to be done correctly, should be done in presence of trained instructor and practiced solo after learning them initially. Since they involve back extension which narrows the foraminal space, they are contra-indicated in certain conditions like back ache and neck pain and digestive disorders. i) The Anjaneya asana: You basically start in half-kneeling position with the left foot on the floor in front and the right leg resting on the knee and ball of foot, behind. Slide the right knee back as far as possible and lunge forward on the left foot by shifting the body weight forward and arching the lumbar spine forward into lordosis with arms outstretched overhead to keep spine elongated. This stretches the front of the right hip, thigh, and anterior spine to effectively stretch the psoas and iliacus, the rectus abdominus and the ALL. Hold pose for 2-3 breath cycles and release by first engaging abdominals to bring spine to neutral and then shifting body weight to come out of lunge position. ii) Dhanurasana or the bow pose: This is done in prone position, lying on the stomach with arms by the side of trunk, palms facing upwards. Bend both the knees bringing the heels of feet to ischial tuberosities or sit bones and hold the feet around the ankles with your hands. As you inhale, lift the heels away from the ischial tuberosities and lift the thigh off the floor as the torso lifts up. Ensure both knees are no more than hip width apart. Hold for 2-3 breath cycles and release by first lowering the thighs and torso while bending the knees. Lastly release the hand-hold around the ankles and extend knees. iii) Ustrasana or camel pose: Begin in kneeling position on the mat with knees hip width apart and dorsum of foot resting on the floor. Place both the hands around the waist, thumb in front and fingers around the back. Gently tilt pelvis back by engaging the abdominals and elongate the lumbar spine. Inhale and lift the sternum (breast bone) upwards. Bring the knee and elbow joints closer together by internally rotating hips and externally rotating shoulders. Stay here for 2-3 breath cycles and slowly slide hands down the back, by extending elbow joints, to the heels of feet. Open the shoulders without squeezing the shoulder blades (releasing the pectorals) and extend the neck by eccentric contraction of neck flexors for slow controlled movement. iv) Bhujangasana: This is one of the postures in the Suryanamaskar. It is done from the prone lying position on the mat (facing the floor) with the dorsum of feet resting on the floor. . The legs are resting on the floor from shin to thigh as you begin lifting the torso while extending the lumbar spine and push the chest out as spinal extension continues along the thoracic spine. The spine should simultaneously stay elongated as you achieve a uniform curve, moving up towards mid and upper back. Lastly extend the neck looking upwards and back. The palms facing down, resting on the floor are just behind the shoulders in the beginning and end up in front of shoulders as end posture is reached. The elbows may be in any degree of flexion to complete trunk extension, based on available range of spinal extension and trunk lift from the floor. Finally, you can push the palms into the mat as you open up the chest by rolling shoulder blades down and in (pectoral and deltoid stretch). v) Backward bend or Hasta Uttanasana: This is the second and eleventh posture in the Suryanamaskar. You begin in standing position (tadasana) with feet about hip width apart. Raise hands upwards overhead with the elbows extended, palms open and stretched out, and upper arms in line with ears as you arch the spine backwards in a backward bend. As you begin the movement, the legs start moving forward at the ankle joints as a unit from lower legs to the hips with the hip joints in extension, the pelvis rotates anterior and the spine from the sacrum to the cervical region starts a gradual and uniform extension movement, the shoulders are neutral with shoulder blades rotated upwards as the gaze fixes upwards on hands or ceiling.
2 Comments
This week we will consider unilateral stretch for the dorsal-lumbar fascia.
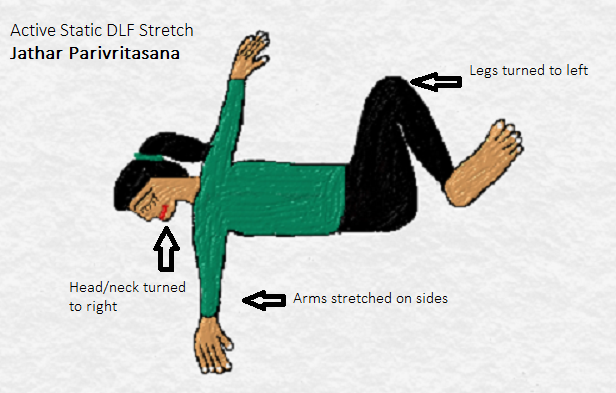
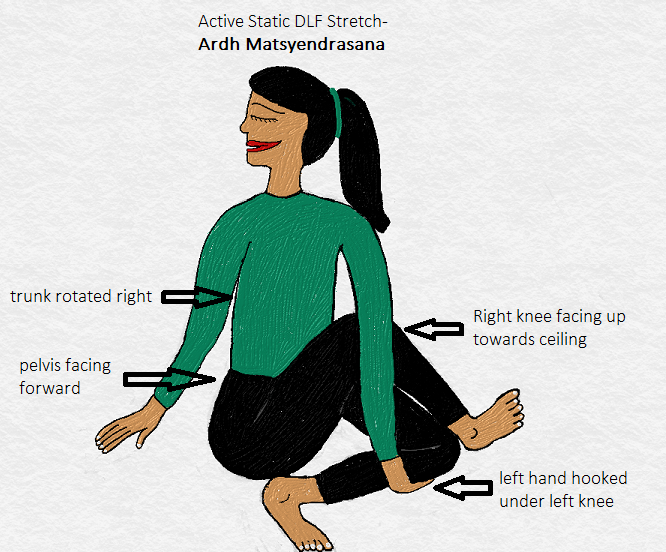
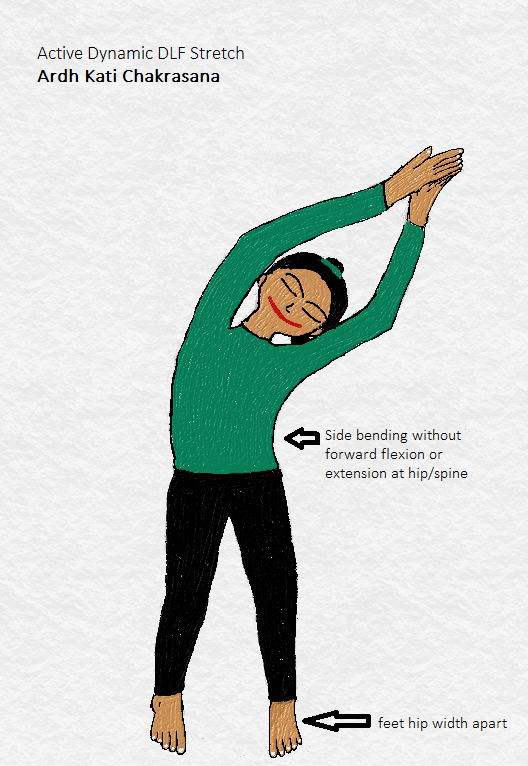
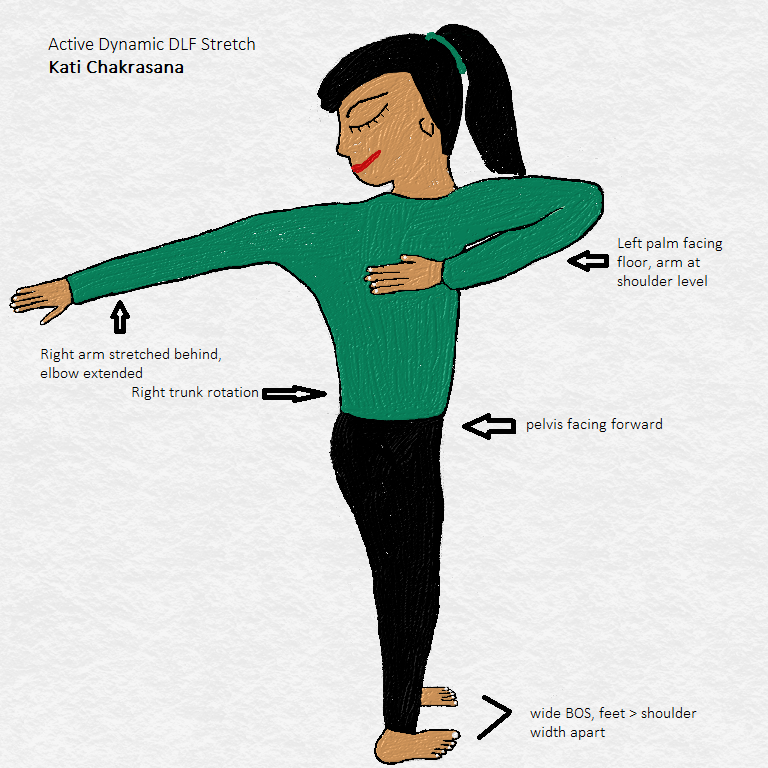
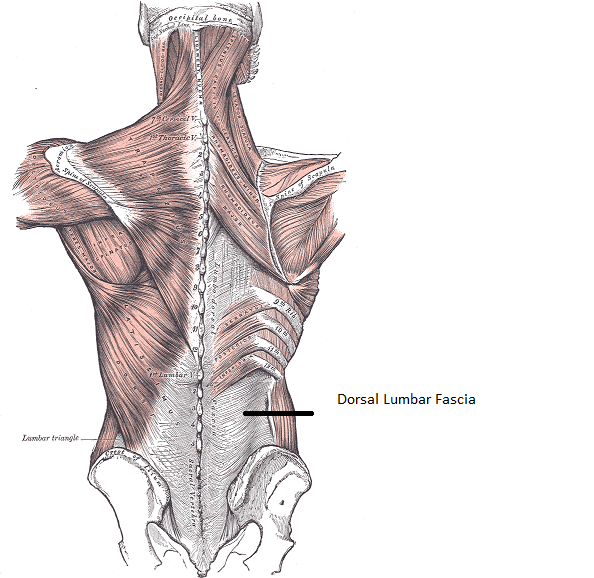
As we already know, the dorsal-lumbar fascia is a diamond-shaped visco-elastic, soft, connective tissue that is vital to static and dynamic stability of the spine and pelvis as well as thoracic-scapular region, permitting the body various degrees of freedom in movement of the trunk and extremities. The DLF is a multi-layered, wide expanse of fascial connective tissue. Various movements bring about a stretch in a segment or particularly oriented fibers of the fascia. It is stretched unilaterally by side-bending and turning activities. Let’s look at some of these. As always, we will look at right sided stretch. The pattern may be reversed for left sided stretch. Passive stretch: This is done while lying supine on the mat. The physical therapist flexes the hips and knees, and turns them as far as possible to the left, ensuring the pelvis and hips move as a unit while both the shoulders are on the ground/mat. This brings about rotation in mid to lower thoracic spine and lumbar spine. The stretch is held as long as possible between 5 seconds to 30 seconds. Then the legs are brought back to neutral in supine. Active Static stretch: i) Supine trunk rotation or jathar parivritasana: Begin in the supine position. Bend the hips and knees so that heels are closest to, or touching, the buttocks. The inner thighs, knees, and ankles touch each other throughout the stretch. Bring the arms to the sides by abducting the shoulders (shoulders should stay on the ground) and pronating forearms, so that the palms are facing the floor. Lift the feet slightly off the ground, ensuring the tailbone is still resting on the ground. Rotate the trunk by moving the legs to the left while the head turns to the right. Hold the end position for as long as possible between 5 seconds to 30 seconds. Bring the legs back to center and rest them on the ground. ii) Ardh Matsyendrasana: This asana is done on the floor or on a mat in seated position. Begin in cross-legged seated position. Bring the right foot next to the left thigh, just above the left knee, so that thigh and leg is upright and the right knee is pointing toward ceiling. Reach overhead with the left hand and elongate the spine while bringing torso close to the right thigh. With the left arm reach across the right knee, gently pushing the right thigh across midline, into hip adduction and if possible, bring a left flat palm onto the floor by hooking it under the left knee. The left arm is externally rotated and supinated to achieve this position. Next, turn the trunk and neck to the right bringing the right hand to the floor behind the torso for spinal rotation to right. Ensure the pelvis is facing forward, while the left shoulder moves away. This stretches the diagonal fascial fibers /aponeurosis of right gluteus maximus and left latissimus dorsi. Hold the position for few seconds. Release asana by bringing spine to neutral rotation, unhooking the left hand and bringing right leg back to cross-legged sitting position. Active Dynamic Stretch: i) Side bending or Ardh kati chakrasana: Stand with feet about hip width apart, spine upright and elongated. Raise both arms up overhead elongating spine, and join palms in namaste as you inhale. Slowly exhale as you bend to the left and hold in fully exhaled, side-bend position (that is pure lateral flexion) for as long as possible. It is important to keep hip and trunk neutral in the sagittal plane without bending forward or backward (no hip or spine forward flexion or extension). This stretches the DLF on the right side. Slowly return to neutral trunk position as you inhale. ii) Kati Chakrasana: Begin in the standing posture with feet slightly more than shoulder width apart. As you inhale, raise both arms to shoulder level with palms facing the floor and middle fingers meeting in the midline, in front of the heart. Exhale as you rotate trunk over the right shoulder and extend right elbow looking behind. The pelvis should face forward without rotation in transverse plane, so that rotation takes place only in the spine (no hip rotation). This stretches the diagonal fascial fibers /aponeurosis of right gluteus maximus and left latissimus dorsi. Hold at end range for as long as possible. Inhale as you rotate trunk to neutral and face forward. Stretching with tools and equipment: This was described in detail in the last post, dated May 19th. Proceeding cranially, after considering major lower extremity muscles and stretching techniques, we come to the trunk.
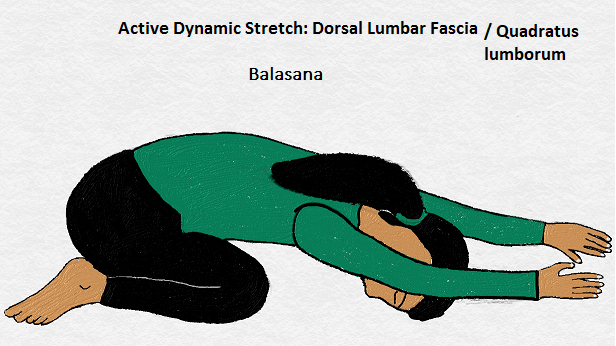
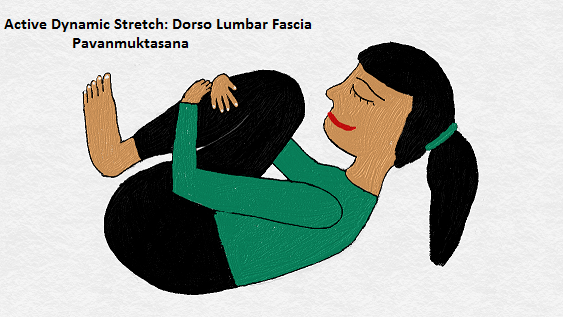
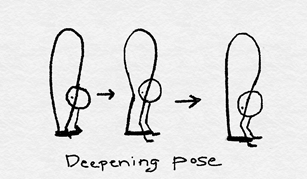
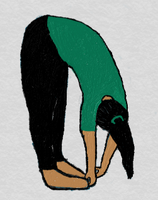
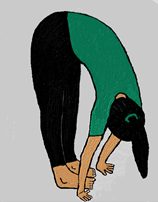
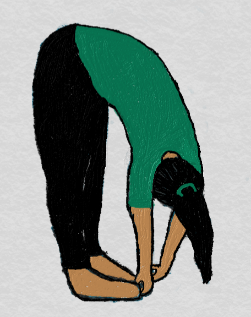
Ever notice, when you get up in the morning and you stretch with arms overhead and leaning backwards, opening the front chest and abdomen, bending to the sides with arms stretched overhead or even rounding the mid/upper back and shoulders? Aah! That feels so good. All these are stretching muscles in the trunk. Let’s see them one group at a time. Today we will see the DLF or the dorsal-lumbar fascia, so known because of the span of fascial connective tissue extending in the dorsal(thoracic) and lumbar regions of the spine/trunk. The fascia is a visco-elastic tissue that contracts (resulting in stability through contractions of the various muscles which insert via aponeurosis into this fascial sheath) and expands (allowing mobility during forward and lateral flexion movements of the spine). This fascial sheath encases various muscles and accepts muscle insertion forming aponeurosis. The posterior layer (deep lamina) with the middle layer encases the iliocostalis, longissimus, multifidus, and erector spinae muscles. Laterally, this sheath forms the aponeurosis with transversus abdominus. The posterior layer (superficial lamina) also receives insertion of latissimus dorsi forming aponeurosis with latissimus dorsi. The quadratus lumborum (QL)muscle lies between the middle and anterior layers. The psoas muscle lies anterior-most, being separated from the QL by the anterior layer. The fascia itself originates from the spinous processes of the dorsal and lumbar vertebrae, supraspinous and interspinous ligaments, the iliac crest, SI joint and sacrotuberous ligament. Thus, it covers a large, diamond-shaped area, in the back. Together with the abdominal muscles (transversus abdominus and obliques) and back extensors (Longissimus, iliocostalis and multifidus), it forms a corset-like structure in the trunk, providing static postural and dynamic stability during the various movements. The latissimus dorsi and contralateral gluteal muscles and the internal oblique with the contralateral hip adductors exert forces through the DLF, contributing to trunk stability. Hence, even though, the DLF is not a muscle, it has a major contribution to healthy functioning of the trunk, both during static postural maintenance and dynamic movement in various planes. Now, let us consider the technique for stretching the Dorsal-Lumbar Fascia or DLF, bilaterally and symmetrically. Passive stretch: In the supine position, the therapist brings the hips and knees into maximal flexion with knee to chest position, thus flexing the lumbar spine with posterior pelvic tilt, lifting the buttocks off the mat. The head and neck are flexed bringing the chin to knees, thus rounding the back completely. It is important to note, that mechanism of stretch through tension in passive stretch (stretching fascial tissue throughout its course by posterior pelvic tilt and spinal flexion) is different from an active stretch in which case, the contraction of muscles and resulting tension in the fascia contribute to provide stability to the spine and pelvis during functional movements. Active Static Stretch: In this post, we are basically looking at symmetrical, bilateral stretch. Hence any forward bending activity is effective. i) Paschimottasana: Begin on the floor mat in long sitting position or dandasana. Allow the low back musculature to contribute to sitting upright. Hands are placed besides the hips on either side with fingers pointing forwards. Elevate the arms overhead, elongating the spine (transversus abdominus and latissimus dorsi engaged). Slowly rock back and forwards by tilting pelvis and bring hands to knees, shins and big toes of feet in succession. Deepen the pose during exhalation. Gently bring the elbows to floor by side of knees and lower the forehead to the knees. Hold for 5 to 30 seconds. To release, slightly bend the knees, lift head and arms overhead and come into dandasana. Active dynamic stretch: i) Balasana: Also known as child’s pose or prayer pose. Begin in kneel sitting pose or vajrasana with an upright, elongated, spine that is engaging of transversus abdominus, erector spinae, and multifidus. The feet should rest on dorsum with toes pointing behind or slightly inwards. Sit completely with buttocks/back of thighs resting on the heels. Bring the knees apart. Begin bending forward at the hips and lower the torso to the ground, bringing the forehead to the floor. The arms are outstretched overhead to stretch the DLF through the latissimus dorsi. Hold for 5 to 30 seconds, then release by bending the elbows and pulling hands towards torso, lift the forehead off the ground, sit up by extending at hip and tilting pelvis anteriorly towards neutral. ii) Pavanmuktasana: This active stretch is much the same as a passive stretch in supine position. Bend the hips and knees from neutral supine position, so that the heels are as close to buttocks as possible. Lift the feet off the floor bringing the knees to chest and lifting tailbone up, tightly circle arms around the shin and pull up while raising the head from the floor to bring the forehead/ chin to knees. Deepen pose on exhale and hold for 5 to 30 seconds, then release by lowering head to floor first, next the pelvis/tailbone and finally and expands he feet. Straighten the legs to come back to supine position. Stretch with equipment/tools: Foam roller stretch: Place the foam roller on the mat. Sit on the mat with the foam roller placed perpendicular to the trunk/spine. Lie down with upper thoracic spine on the foam roller, keeping the hip and knee flexed with feet on the floor. Cross arms and place them over stomach/abdomen. Roll upwards/cranially on roller slowly and hold in places which are tender (trigger points), to allow them to release. Progress in small increments rolling back and forth along the back of trunk till you reach the sacrum. You can also place the foam roller lengthwise along spine and roll it outwards to release the diagonally or laterally arranged connective tissue. Last week was a deviation from the stretch posts and diving into yoga in healthy living.
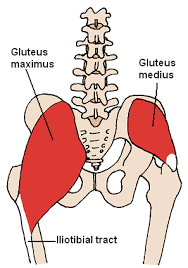
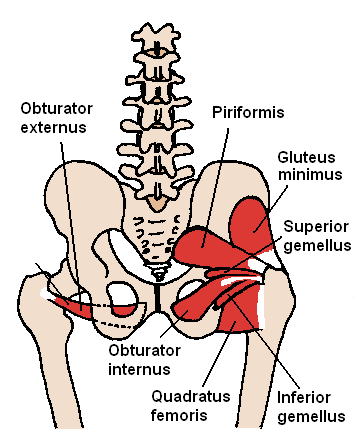
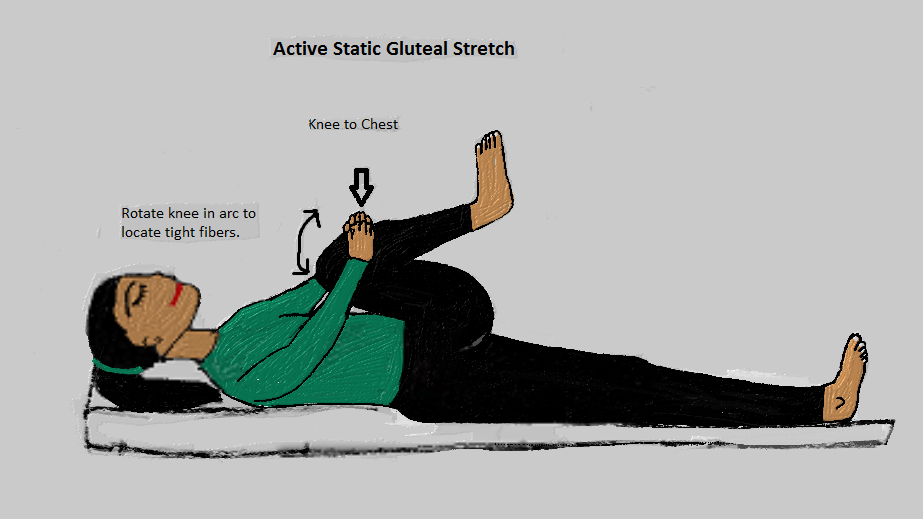
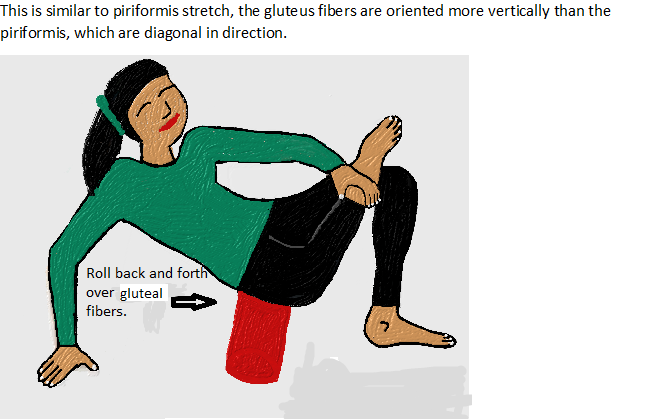
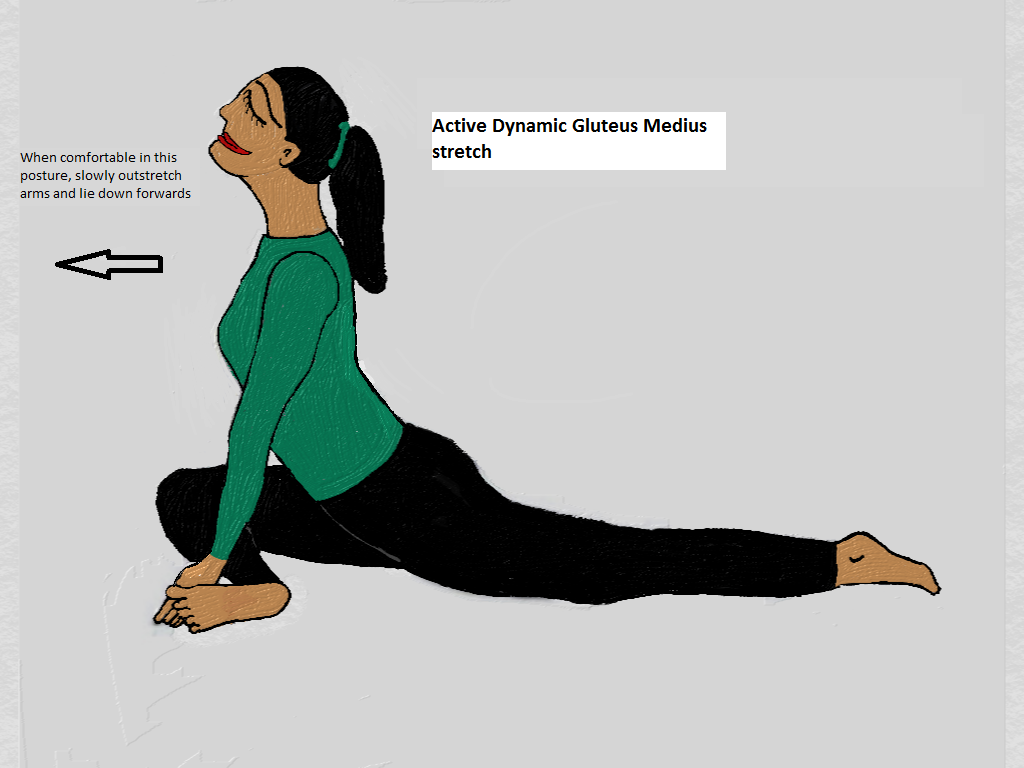
Getting back to the lower extremity stretches, gluteal stretch is the last in the series. There are three gluteal muscles, the deepest being the gluteus minimus, next the gluteus medius and gluteal maximus being the most superficial muscle. • The gluteus maximus originates from the posterior gluteal line (on ilium), the iliac crest, the sacrum, coccyx, the sacrotuberous ligament, and lumbodorsal fascia. It inserts in two parts: • i) majority of fibers insert into the iliotibial band after passing over the greater trochanter (here it is protected by a bursa between the tendon and bone), ii) the rest of the fibers insert into the gluteal tuberosity on the femur. • The gluteus medius originates between the anterior and posterior gluteal lines on the ilium and completely covers the deeper gluteus minimus. It inserts into the greater trochanter of femur. • The gluteus minimus originates between the anterior and inferior gluteal lines on the ilium and inserts with the gluteus medius on the greater trochanter of femur. The gluteus maximus and hamstrings are the major hip extensors. The gluteus maximus being a one-joint muscle, functions only as extensor at the hip joint. The gluteus medius is an important hip abductor, especially during walking, as it prevents the pelvis from dipping when the contralateral leg is in swing phase. Since the gluteal muscles are fan-shaped covering a wide area, stretching them is not done in one fixed position, albeit it varies from person to person, and also the same individual may experience stretch at more than one angle. It is good to explore the span of the muscle and stretch as tightness is encountered. Here are ways to stretch the gluteal muscles. These are similar to piriformis stretches. As always we will consider right sided stretch for ease of understanding. However it is good to stretch muscles bilaterally (both sides). Passive Stretch: This is done on the mat in supine position, with the left leg in neutral. The therapist flexes the right hip and knee to end range of motion. Hip flexion is limited by approximation/contact of soft tissue and has a soft- tissue like springy end-feel. The span of muscle is stretched by rotating the right knee from pointing to left shoulder and gradually aligning with hip joint to pointing outwards in an arc. When a stretch is experienced, the position is held between 5-30 seconds for as long as possible. Active Static Stretch: This can be done in supine with the individual flexing the right hip and knee to end range of motion. Circle the thigh/leg with both arms and pulling the leg towards the chest/abdomen. Move the right knee in an arc from pointing at left shoulder, to pointing caudally (towards head), and finally, outwards. Hold the position between 5-30 seconds, for as long as possible. Active Dynamic Stretch: i) The pigeon pose or kapotasana: You begin from the plank pose and bring the right foot onto the floor in front of the left hip joint. Bring your foot and toes up while sticking out the ball of right foot and push the outside of foot onto the mat. Bring the right knee to the floor. The hip may be abducted so that the knee is slightly lateral to the hip and slowly scoot the left leg back and rest the top of foot onto the mat, ensuring the left hip is in line with the left foot at all times and the body weight is centered. The forearms here will rest on the mat as you continue slowly scooting the left foot back and elongating the body. When you feel a stretch in the right buttock area, stay there for a while. Deepen the stretch when possible by lowering the trunk to the floor and outstretching the arms in front during exhalation. ii) Ardh Matsyendrasana: This asana is done on the floor or on a mat in seated position. Begin in cross-legged seated position. Bring the right foot next to the left thigh, just above the left knee, so that thigh and leg is upright and the right knee is pointing toward ceiling. Reach overhead with the left hand and elongate the spine while bringing torso close to the right thigh. With the left arm reach across the right knee, pushing the right thigh across midline, into hip adduction and if possible, bring a left flat palm onto the floor by hooking it under the left knee. The left arm is externally rotated and supinated to achieve this position. Next, turn the trunk to the right bringing the right hand to the floor behind the torso for spinal rotation to right. Hold the position for few seconds. Release asana by bringing spine to neutral rotation, unhooking the left hand and bringing right leg back to cross-legged sitting position. Stretching with tools equipment: i) Foam roller stretch: This is similar to piriformis stretch, except that the gluteus fibers are oriented more vertically than the piriformis, which are diagonal in direction. For effective stretch, it helps to orient the foam roller perpendicular to the direction of muscle fibers. Place the foam roller on the mat and sit on it. Bend both the knees with feet flat in front on the mat. Bring both palms on mat, behind the roller and shift your weight onto the arms. Lift the right foot off the mat and bring it onto the left thigh, right ankle resting just below the left knee. Make a quarter turn to half a turn to the right side and gently roll the foam roller under the right buttock. You can release different segments of the muscle by rolling further onto right side in small increments. Base the body weight you put onto foam roller by the intensity of release experienced. This week has flown past preparing for a health fair at the Bay Area Vaishnav Parivar (BayVp).
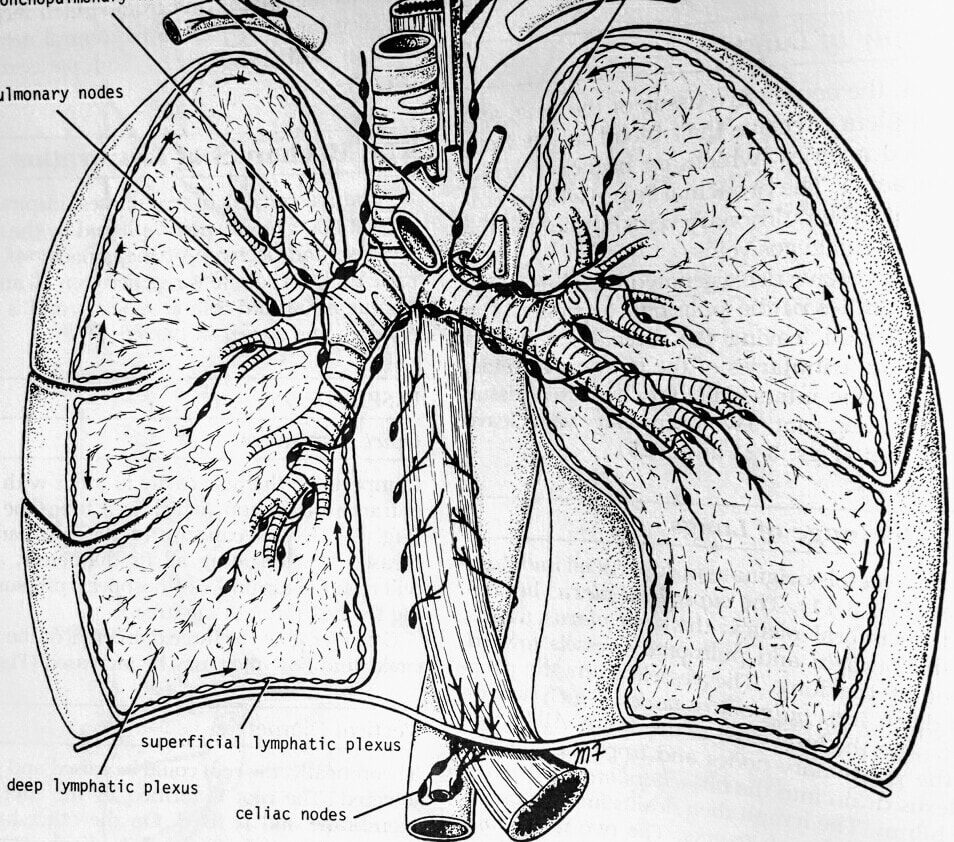
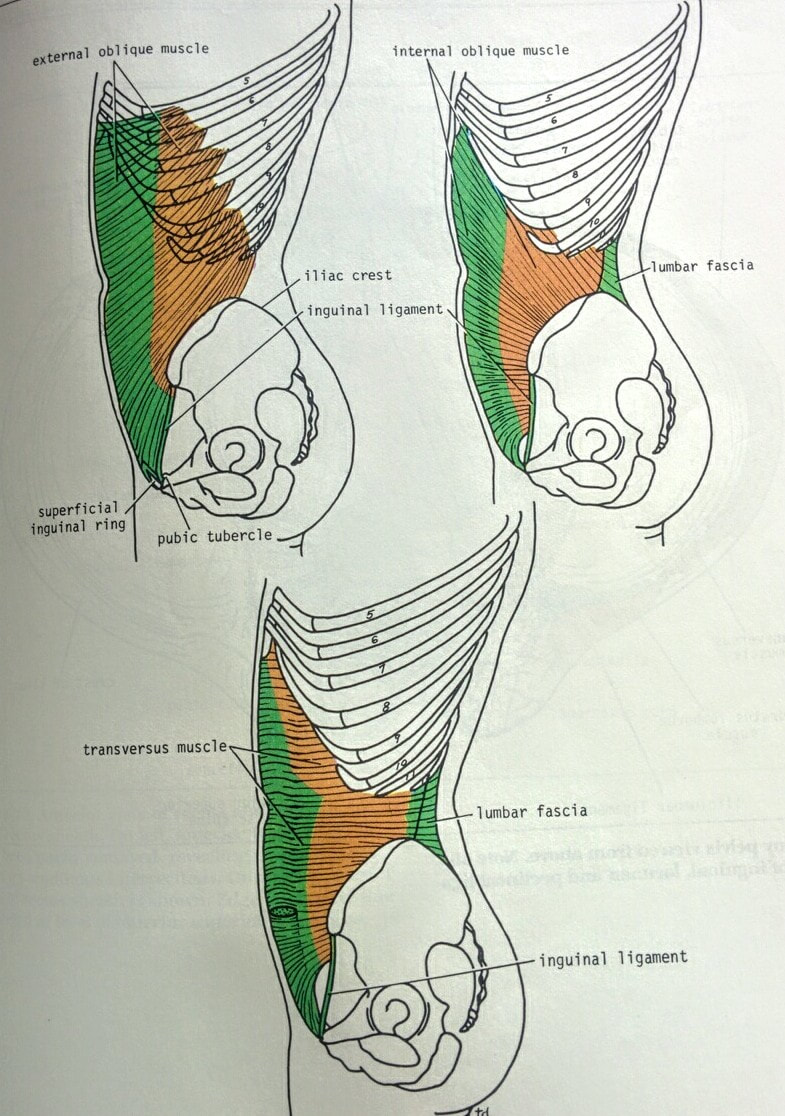
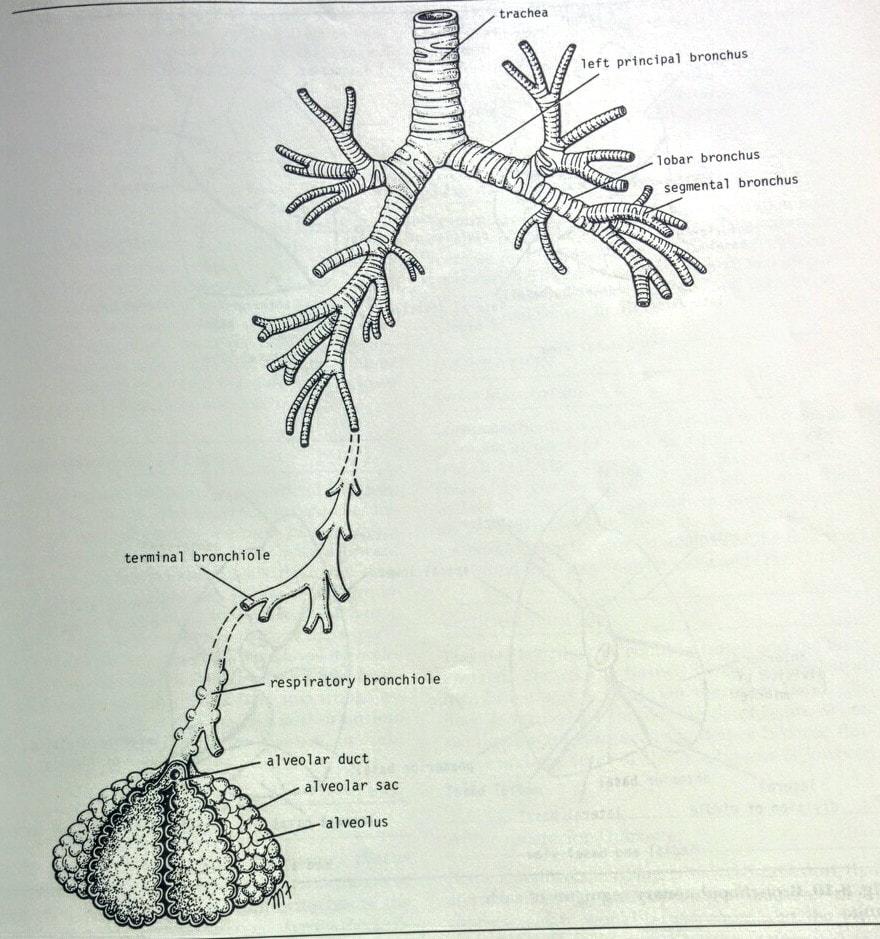
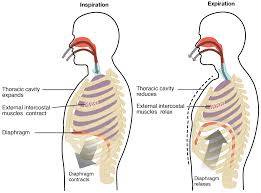
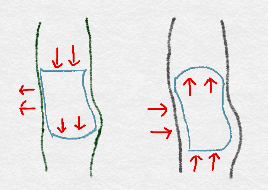
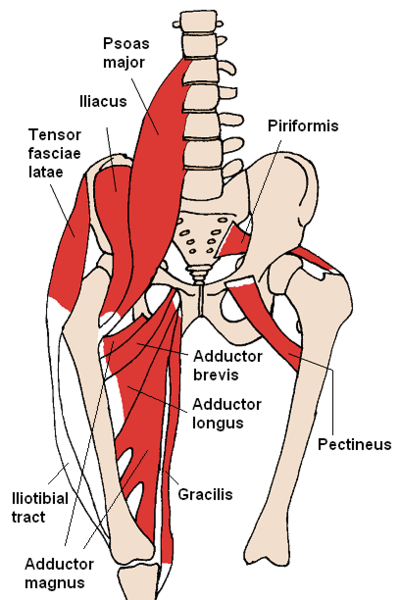
The topic was dear to me so, I just dove in: “Yoga for (in) Healthy Living.” Decided to consider asana and pranayama, which are two of the most popular limbs from ashtanga yoga being adapted widely in the USA, and are intimately related to physical therapy. The eight limbs being yama, niyama, asana, pranayama, pratyahara, dharana, dhyana and samadhi. I have covered Suryanamaskar in some detail in earlier posts, so it is only apt to consider pranayama in this post. Pranamaya kosha is one of the five sheaths by Patanjali (who is considered to be the father of yoga). Pranamaya kosha is constituted of “energy” rejuvenated through breath, communicating with subtle layers-vital, mental, psychic, and spiritual. Simultaneous processes are going on at various levels –for example biomechanically at the gross or physical level, physiologically at subtle or cellular level, sensory stimulation and processing at manomayakosha (mind) and a true understanding of this at the vijnanmayakosha (wisdom/discriminatory intellect), and just pure bliss from nourishment of being (anandamayakosha) . Essentially, the body functions through the energy it gets from food we consume and the air that we breathe is used to “burn” (jatharagni) the food to release energy, which we then use to accomplish various life processes and works. This is the process of respiration which occurs at the cellular level. The energy from the sun is stored in form of foods in the plants, vegetables, fruits, etc.; we consume. The air we breathe provides the fuel (oxygen) to burn the food. The air we breathe goes into the lungs, which expand as the air fills the air sacs. From the air sacs, the oxygen dissolves into the blood and is carried away by the blood to the cells for respiration (or burning the food consumed to produce energy). At the same time the diaphragm contracts, the pelvic floor muscles relax and allow the abdominal organs to be accommodated and the abdominal wall moves out. This is inhalation. The abdominal muscles- the transversus abdominis and internal obliques contract as the diaphragm relaxes and the abdominal contents push up narrowing the chest cavity. This is exhalation. The transversus abdominis is in a mild contraction all the time, since it is a postural muscle. This stabilizes the spine. The fascial sheath wraps all around the low back like a corset. • Simply put, when one breathes in, the stomach/abdominal wall moves out and the chest cavity expands. • When one breathes out, the abdominal wall recoils inwards as the diaphragm relaxes and abdominal contents push into the chest cavity which also deflates (much like a balloon filling with and loosing air). Practicing Sahaja Pranayama • Sit cross-legged in sukhasana, padmasana, ardh padmasana, or on a chair (comfortable position). • Maintain good upright posture in the spine. • Look down by lowering the head. Breathe in through the nose. The stomach/abdominal wall moves out slightly and the chest cavity expands all around. • Look straight forward by raising the head. Breathe out through the mouth. The stomach/abdominal wall recoils inwards as the diaphragm relaxes and abdominal contents push into the chest cavity which also deflates much like a balloon loosing air. (P.S. The pictures for this post are from Clinical Anatomy by Richard Snell and from reuseable online sources.) This week let us consider the piriformis stretch. The piriformis muscle is a small deep muscle which lies in the gluteal region. It originates from the front or anterior portion of the sacrum, the sacro-iliac joint (SI jt.) capsule and the sacro-tuberous ligament and inserts onto the greater trochanter of femur. It functions as a lateral rotator of the hip, flexes and abducts hip and with the hip flexed 60°-90°, it works as a hip medial rotator and extensor and continues to abduct hip. In other words, the position of the hip is important in determining the function of this muscle. Also, the stretch position therefore varies with hip position and appears paradoxical. However, both positions (whether in hip flexion or in neutral hip position) are successful in stretching the muscle. Once you realize this, it enables the hip to open freely and both movements benefit from any one stretching technique, since the underlying muscle we are stretching is the same. This in some way brings shavasana to mind, the goal of the asana being relaxation. One technique used to relax the body is by initially tightening it to utmost, and then to “let go,” (here you are using muscle tightening to experience relaxation). The relaxation achieved by this method is tremendous and experienced in the given moment of “letting go.” With practice, you eventually learn to let go without the need of initial tightening. Enough said, lets delve into the stretches, considering the right side stretch for ease of understanding.
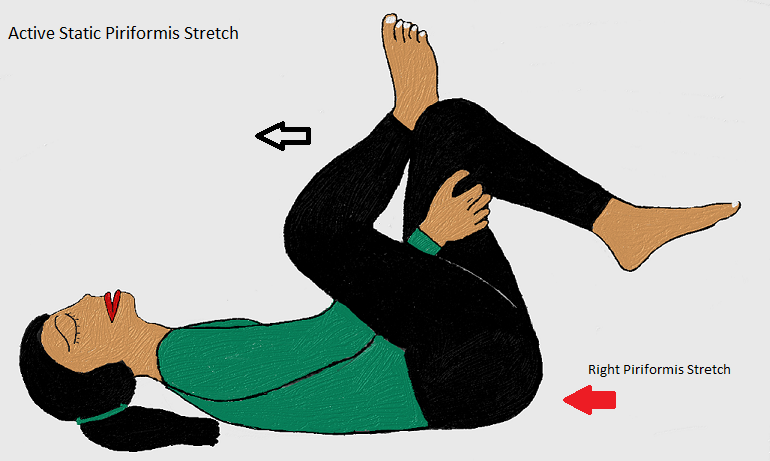
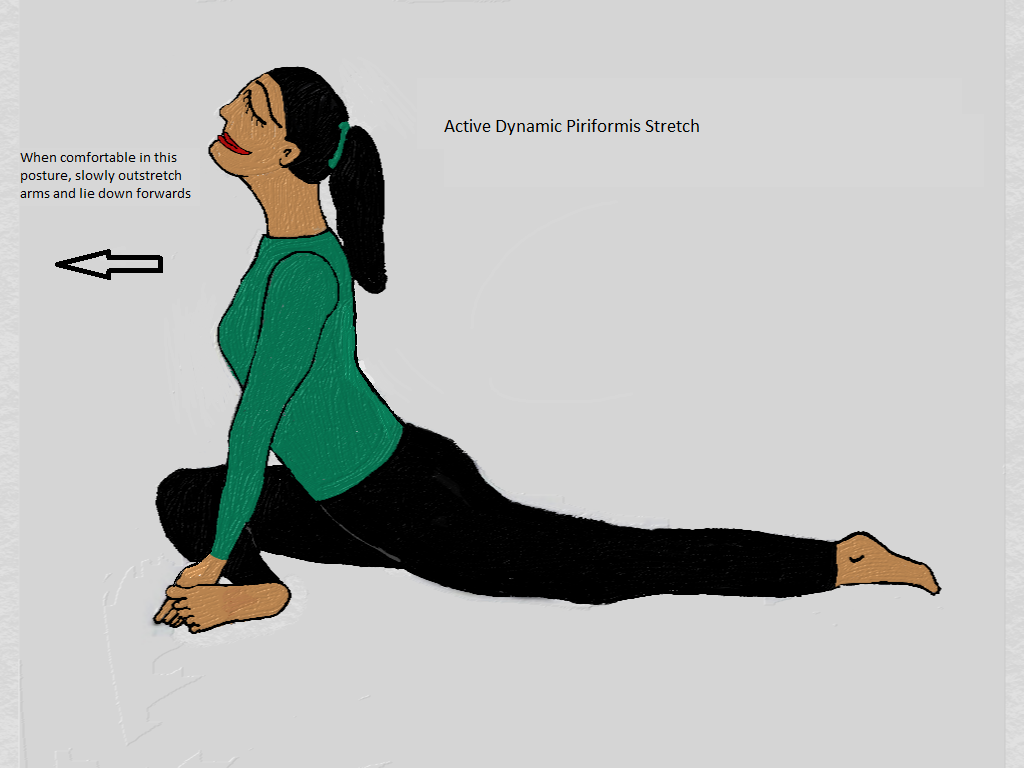
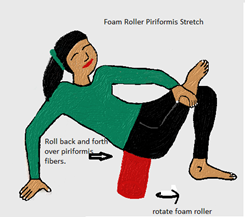
Passive stretch: i) In the supine position, the therapist flexes (less than 60° hip flexion), adducts and internally rotates, the right hip, with the back in neutral and pelvis level on the mat. One hand is placed on the outer side of the right knee and other on the right ASIS or iliac crest. ii) In supine with the left leg in neutral, the therapist flexes the right hip greater than 60°, abducts and externally rotates the right hip, then slowly moves the right lower leg towards the left shoulder to deepen the stretch as the sacrum and greater trochanter of femur move away from each other. Active Static Stretch: i) The reverse pigeon pose stretch or popularly known as figure of 4 stretch: In supine position, bend both the hips (greater than 60°) and knees so that feet rest on the mat. Lift the right foot off the mat to bring knee to chest and simultaneously turn the hip outward so that the right ankle rests on the left thigh (just above the left knee). Now with both the hands, grasp the left thigh and gently bring it toward your chest by lifting the left foot off the mat. When you do this, it is natural for the tailbone and sacrum to lift off the mat as well. Bring the sacrum and tailbone down to the mat, (thus bringing the lumbar spine from flexion to neutral), to deepen the stretch. This way, the sacrum is held stable, while you move the femur to bring about the stretch. Active Dynamic Stretch: i) The pigeon pose or kapotasana: You begin from the plank pose and bring the right foot onto the floor in front of the left hip joint. Bring your foot and toes up while sticking out the ball of right foot and push the outside of foot onto the mat. Bring the right knee to the floor. The hip may be abducted so that the knee is slightly lateral to the hip and slowly scoot the left leg back and rest the top of foot onto the mat, ensuring the left hip is in line with the left foot at all times and the body weight is centered. The forearms here will rest on the mat as you continue slowly scooting the left foot back and elongating the body. When you feel a stretch in the right buttock area, stay there for a while. Deepen the stretch when possible by lowering the trunk to the floor and outstretching the arms in front during exhalation. Stretch with equipment or tools: i) Foam roller stretch: Place the foam roller on the mat and sit on it. Bend both the knees with feet flat in front on the mat. Bring both palms on mat, behind the roller and shift your weight onto the arms. Lift the right foot off the mat and bring it onto the left thigh, right ankle resting just below the left knee. Make a quarter turn to the right side and gently roll the foam roller under the right buttock. You can release different segments of the muscle by rolling further onto right side in small increments and also vary the release by turning the foam roller along the right thigh. Base the body weight you put onto foam roller by the intensity of release experienced. The list of muscles that flex the hip is long. Some of these muscles are single joint while some are 2-joint muscles flexing the hip and extending or flexing the knee.
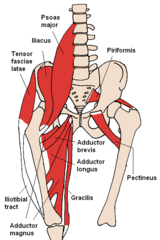
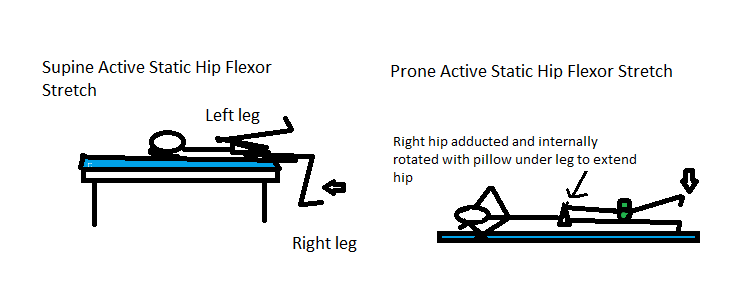
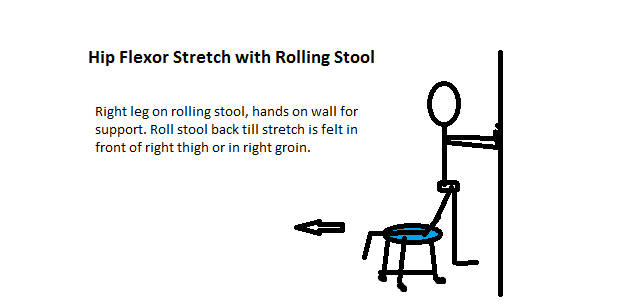
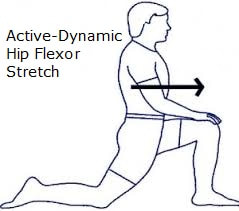
The main hip flexors are the Iliacus and Psoas, collectively known as the Iliopsoas. Iliacus originates from the iliac fossa and AIIS (Anterior Inferior Iliac Spine). The iliacus originates from the transverse processes of lumbar and last thoracic vertebra. Both these combine to form a common tendon of insertion on the lesser trochanter of femur. There are several muscles that cross both the hip and knee like the Sartorius, Rectus Femoris, Tensor Fascia Lata via the IT band. The Pectineus, Adductor Longus and Adductor Brevis are single joint muscles in the medial compartment of the thigh which also serve as secondary hip flexors (primary function of these muscles is adduction) with the thigh turned outwards. The Gracilis also in medial compartment is a two-joint muscle flexing both the hip and the knee. For purpose of stretch, we will focus on the main hip flexors- the iliacus and psoas. Since the Sartorius and Rectus Femoris are also in the anterior thigh compartment, they are stretched to some extent also. The various ways to stretch the hip flexors are: Passive stretch: In supine lying position on the mat, both legs are extended in neutral position. The physical therapist then flexes the left hip/knee completely to bring the knee to the stomach/chest, while the right leg is held straight with the back of thigh, knee, and leg resting on the mat (the right leg should not be allowed to bend/flex at hip and knee). Another thing to watch out for is an increased lumbar lordosis, which also indicates tight hip flexors. The key to stretch here is a posterior pelvic tilt with flattening of lumbar spine, thus pulling the proximal psoas, iliacus, Sartorius and rectus femoris fibers away from its distal insertion on femur or tibia, thus stretching it over the hip joint. Active Static Stretch: i) In supine lying on edge of the mat with the legs dangling over the edge at the knee joints. Place a chair at end of mat with feet supported on chair to maintain neutral spine posture, then engage the abdominals to tilt the pelvis posteriorly as the left hip/knee is held in complete knee-to-stomach/chest position by circling the arms around the left knee. The left hip/knee flexion ensures posterior pelvic tilt. Next, push the chair away from under the right foot and dangle the leg off the edge of mat, flexing the knee if possible. This stretches the iliacus, psoas and the rectus femoris and to some extent the Sartorius muscle. ii) To stretch Sartorius, prone lying is best position. Here you have to watch for the lumbar spine, since when hip flexors are tight, they tend to pull the pelvis into anterior tilt/rotation and hence cause the lumbar spine lordosis to increase. So always be mindful of the lumbar spine position and keep the transverse abdominus engaged. Next, flex the right knee and turn the thigh to point inwards or drop the ankle out (hip medial rotation) and also slide the thigh inwards to the midline (hip adduction). Now slowly drop the foot to mat by extending the right knee. Hold if stretch is felt, if not, lift thigh off the mat by extending the hip. You may place a pillow under the knee to hold hip in extension and then slowly extend the knee. Watch for the lumbar spine though, ensuring extension at hip (10°-15° only) and not increased lordosis at the lumbar spine. There are lots of elements in this stretch to get it correctly. Active Dynamic Stretch: There are several yoga asanas that stretch the hip flexors. These asanas entail nuances in muscle control and to be done correctly should be done in presence of trained instructor and practiced solo after learning them initially. Since they involve back extension which narrows the foraminal space, they are contraindicated in certain conditions like back ache and neck pain and digestive disorders. i) The Anjaneya asana: You basically start in half-kneeling position with the left foot on the floor in front and the right leg resting on the knee and ball of foot, behind. Slide the right knee back as far as possible and lunge forward on the left foot by shifting the body weight forward and arching the lumbar spine forward with arms outstretched overhead to keep spine elongated. This stretches the front of the right hip, thigh, and anterior spine to effectively stretch the psoas and iliacus. When the right knee is flexed, and resting on the ground, it stretches the rectus femoris, and when the right knee is extended lifting it off the ground in lunge position, it stretches the Sartorius at the knee joint as well. Hold pose for 2-3 breath cycles and release by first bringing right knee to floor, engaging abdominals to bring spine to neutral and then shifting body weight to come out of lunge position. ii) Dhanurasana or the bow pose: This is done in prone position, lying on the stomach with arms by the side of trunk, palms facing upwards. Bend both the knees bringing the feet to buttocks and hold the feet around the ankles with your hands. As you inhale, lift the heels away from butttocks and lift the thigh off the floor as the torso lifts up. Ensure both knees are no more than hip width apart. Hold for 2-3 breath cycles and release by first lowering the thighs and torso while bending the knees. Lastly release the hand-hold around the ankles and extend knees. iii) Ustrasana or camel pose: This asana is intermediate to advanced level and should be done in presence of trained instructor. Begin in kneeling position on the mat with knees hip width apart and dorsum of foot resting on the floor. Place both the hands around the waist, thumb in front and fingers around the back. Gently tilt pelvis back by engaging the abdominals and elongate the lumbar spine. Inhale and lift the sternum (breast bone) upwards. Bring the knee and elbow joints closer together by internally rotating hips and externally rotating shoulders. Stay here for 2-3 breath cycles and slowly slide hands down the back, by extending elbow joints, to the heels of feet. Open the shoulders without squeezing the shoulder blades (releasing the pectorals) and extend the neck by eccentric contraction of neck flexors for slow controlled movement. Stretches with tools and equipment: i) Standing hip flexor stretch with rolling stool or chair: Stand facing a wall with hands stretched forward and palms resting on the wall for support. The rolling stool or chair should be pre-adjusted to knee height. Bend the right knee by lifting foot back and up from the floor till knee is flexed at 90 degrees. Rest the knee on the seat of the stool/chair (chair should be forward facing to allow leg to be supported on chair). Left foot is on the floor and both hands are on wall forming a three-point support base. Engage the abdominals to ensure lumbar spine remains in neutral throughout stretch. Slowly roll the stool/chair back with the right leg by extending the hip joint (not lumbar spine- you are doing this if lumbar arch or lordosis increases). Hip joint has about 10-15 degrees of extension range, so move back slowly to avoid lumbar extension. Hold position for as long as you can, for 5-30 seconds, once you feel stretch in groin area. Release and repeat 2-3 times with 15-30 second rest breaks in between stretches. ii) Half-kneeling with Airex-pad: Begin in half-kneeling position with left foot on floor and right knee on the Airex-pad for cushioning under knee/shin. Engage abdominals to keep neutral pelvis and lumbar spine. Lunge forward on left leg by flexing hip and knee as the right knee stays put on the airex pad slowly and passively bringing extension at right hip joint, thus stretching the single joint hip flexors. Hold position as long as possible from 5-30 seconds, release, and repeat 2-3 times with 15-30 second rest break in between stretches. This week I give due consideration to the Tensor Fascia Lata also known as the TFL and the Iliotibial or IT band stretch. The TFL/IT band is frequently found to be tight in people that walk, run, or ride bicycles, with discomfort/pain in the knee or hip area.
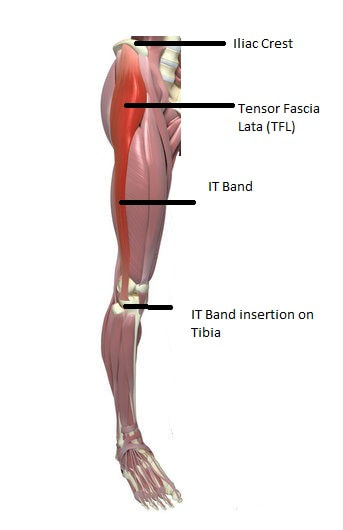
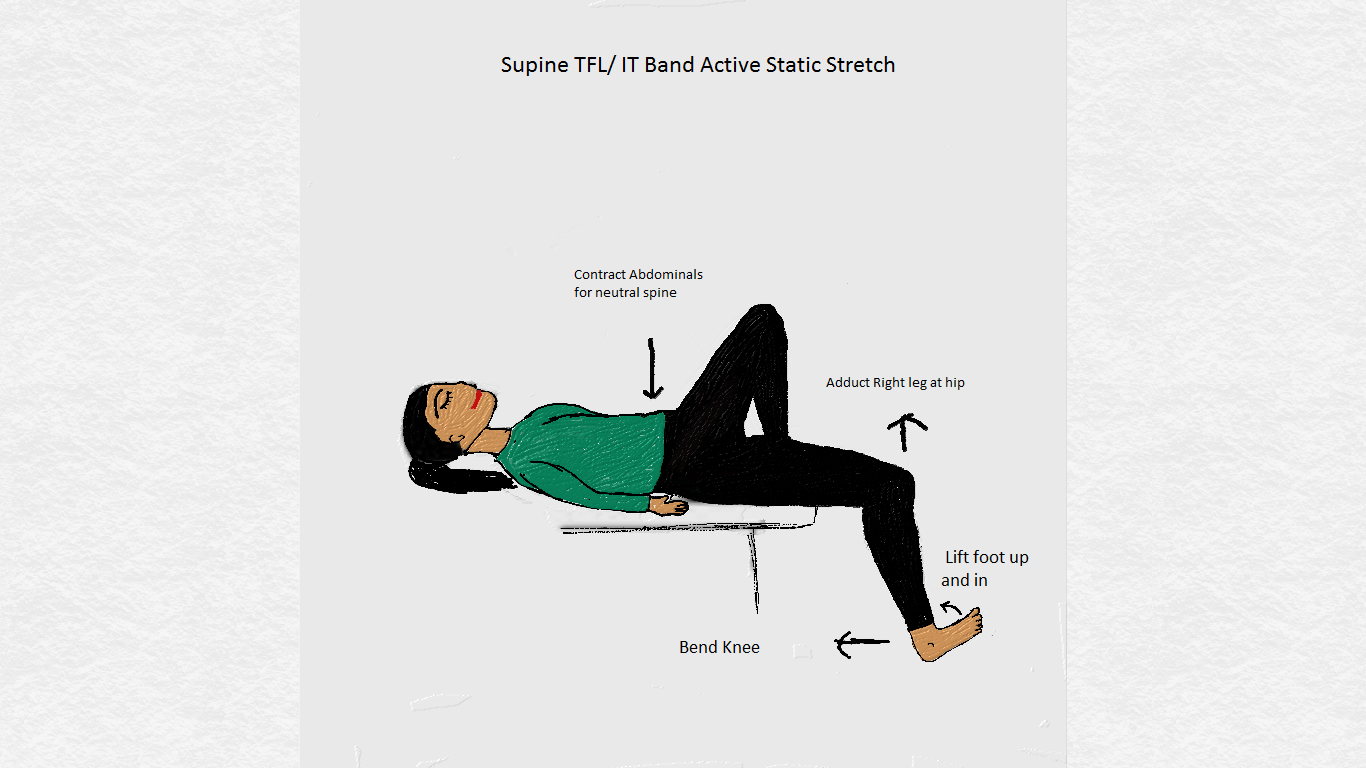
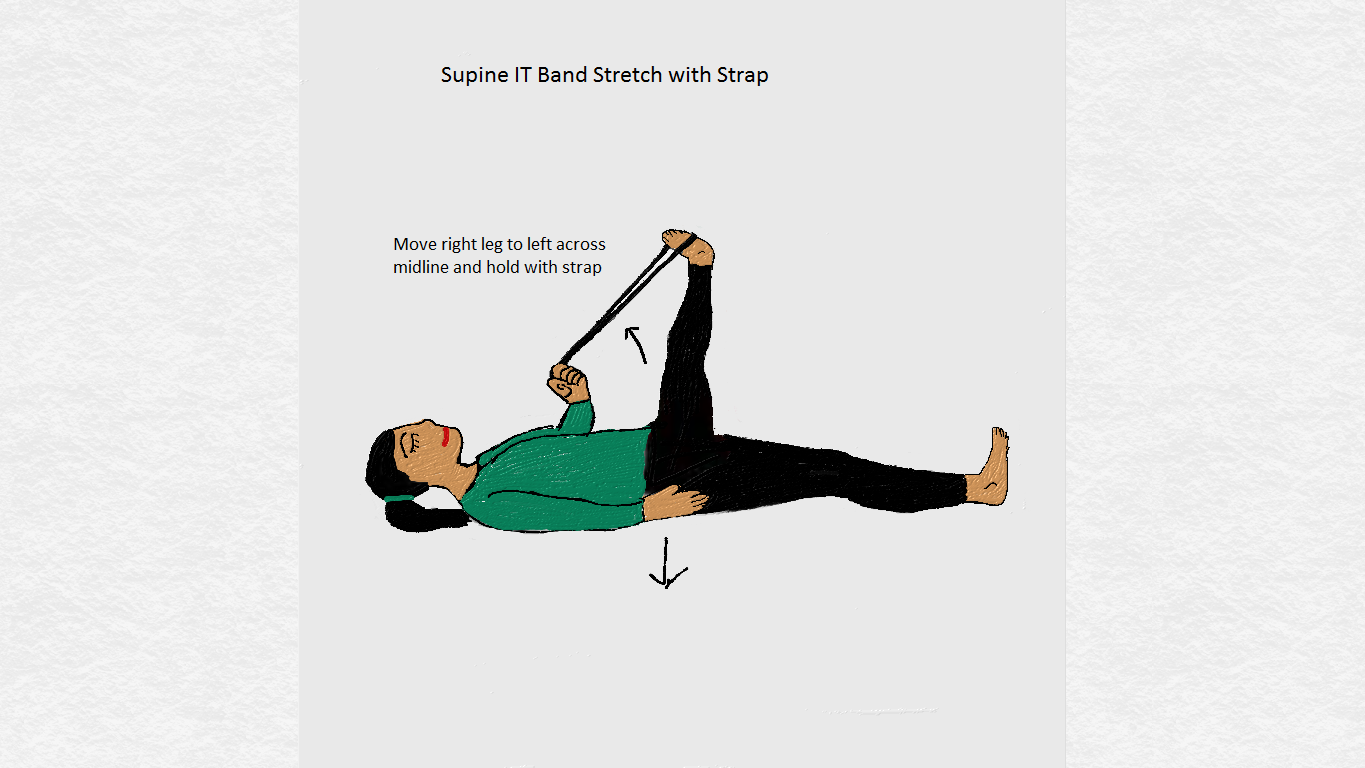
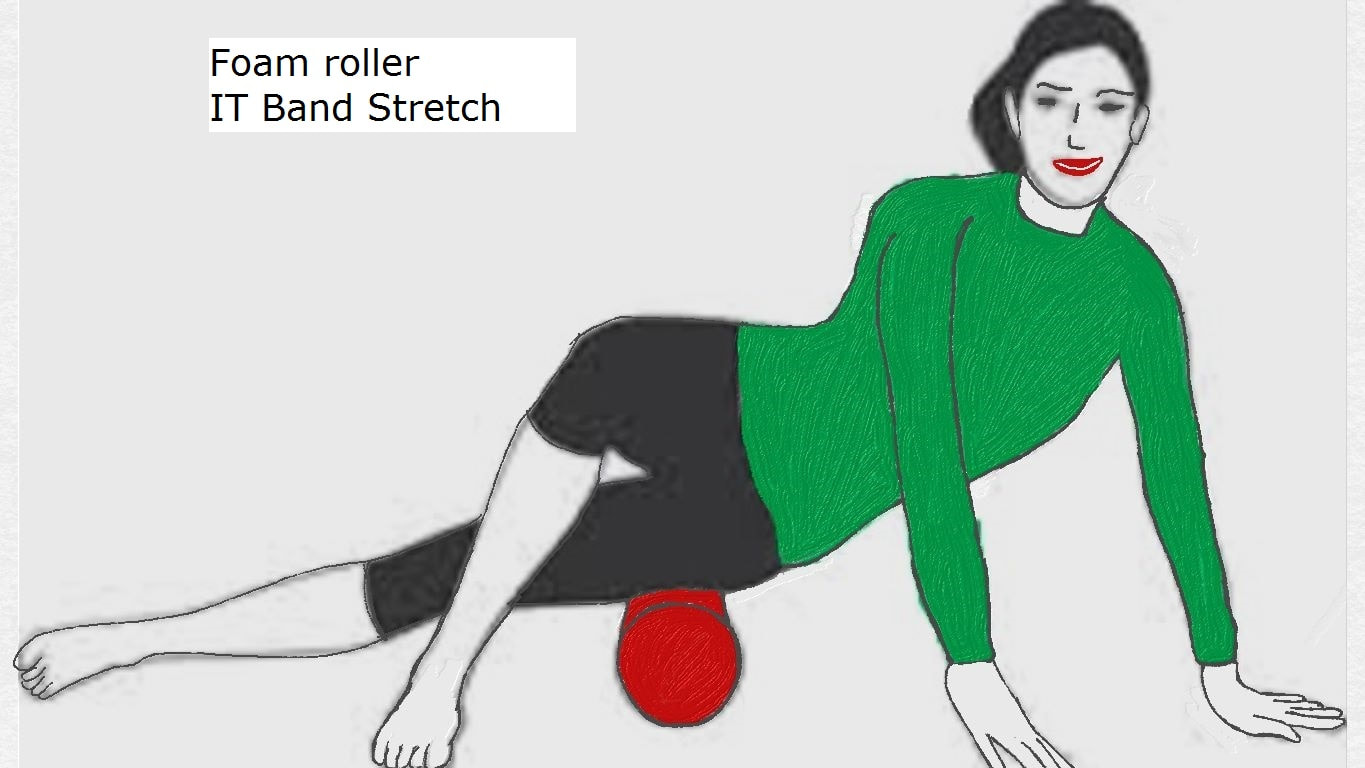
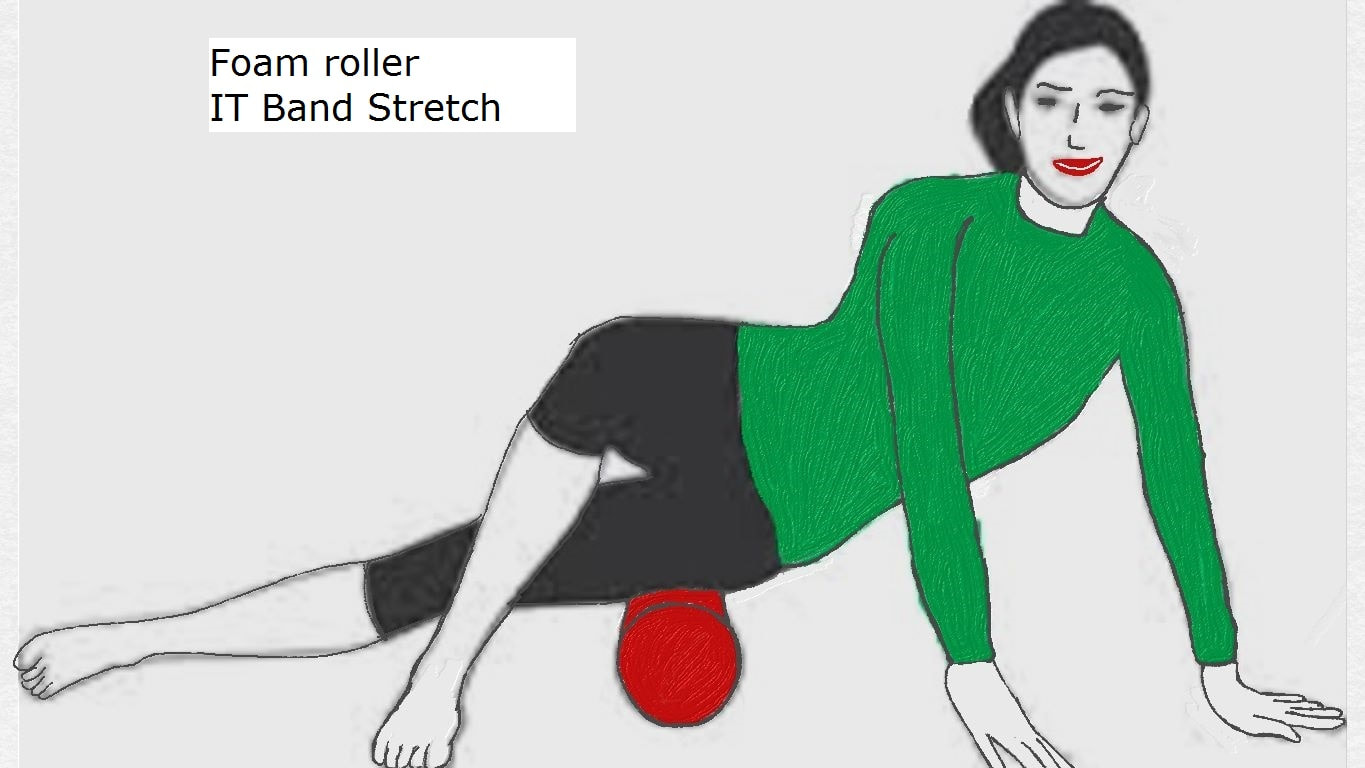
• The TFL is a muscle and it originates proximally from the anterior and outer portions of the iliac crest, the ASIS, and the notch below the ASIS. • The IT band is a fascial connective tissue which is composed histologically of both elastin (elastic connective tissue) and collagen (strong fibrous connective tissue). Fascial tissue surrounds muscles, tendons, and organs, and provides a support structure for the body. • The IT band arises from the iliac crest and receives contributions as a thickening from the Gluteus Maximus and TFL muscles, then runs along the outer length of the thigh, and inserts into the lateral epicondyle of tibia and sends some fibers to the retinaculum of the patella. • Along the way from its origin on the iliac crest, the IT band runs over the greater trochanter of the femur and the lateral femoral epicondyle, just above the knee joint. To lubricate areas where the fibrous tissue runs over bony prominences, bursa (fluid filled sacs), intervene between the bone and connective tissue. These are important, since it is the taut (tight) IT band rubbing against these bony prominences that causes what are popularly known as the IT band syndrome(pain near the outer side of knee joint/lower leg) and the Trochanteric bursitis (pain on outer side of the hip joint/ greater trochanter of femur), respectively. The bursa due to repeated friction get inflamed or it may be the inflammation and/ or strain of the connective tissue fibers itself. Since the IT band receives contribution from the TFL and Gluteus maximus, stretching these muscles will impact the IT band as well. The IT band is difficult to stretch actively and needs a lot attention to positioning and muscular engagement. It is ideally best impacted through soft tissue work like myofascial release of IT band and TFL and stretched best through passive stretch. That being said, let’s delve into the stretch: Passive Stretch: This is done in supine position with both legs straight on mat in neutral position. The therapist stabilizes the right pelvis at ASIS and flexes the right hip to clear the left leg, as the right leg is moved into hip adduction with the knee supported in extended position. The stretch is held for 5-30 seconds and then released for 15-30 seconds of rest before next repetition. Active Static stretch: i) In the supine position on a high mat or bed, scoot the legs out the side of the mat till the knee bends to 90 degrees and allow both the lower legs to dangle off the edge. Place a chair at the edge of the mat /bed initially, so you can rest your feet prior to the stretch (so that you do not arch the back due to weak abdominals or tight hip flexors). Bring the left foot onto the mat by bending the hip and knee. Allow the right leg to dangle off the mat by pushing the chair away from under the right foot. Bring the right hip into slight adduction and engage the abdominals to keep the spine neutral (if the lumbar spine arches, it indicates a tight TFL/hip flexors. Next raise the right foot up and in at the ankle joint/ foot, to engage the tibialis anterior muscle. This completes the stretch. Hold for 5-30 seconds maintaining the position. Rest for 15-30 seconds between the stretches. Active Dynamic Stretch: i) Half-kneeling: To stretch the right TFL/IT band, bring the right knee to the floor on a cushion with the shin resting on the floor and foot outstretched behind. The left foot rests on floor in front of the right knee. You may do this near a wall or support you can lean on. Make sure you start with hip over right knee and neutral, upright spine. Push the right hip outwards leaning onto wall/support. To deepen the stretch, shift body weight forward over the left leg bringing the right hip into extension, stretching the TFL further. Stretch With Tools or Equipment: i) Stretching with strap or gait belt: In supine lying position with legs extended and supported on mat/bed, loop a strap or gait belt around the right foot arches. Keeping the knee straight, raise the leg up from mat by flexing the hip joint and cross the leg to the left side across the midline of the body. Hold the other end of the strap in your hand and pull taut for support. The pelvis should be flat on the mat (with both sit bones in contact with mat), and not roll along with the right leg by lifting off the mat. ii) Stretching with the foam roller: With the foam roller across the mat, lie on it along the outer side of the right thigh. Gently roll along the length of the outer thigh from the iliac crest (bony ridge forming the top of the pelvis at your waist) to the outside of the knee joint, while the left foot and hands assist in the rolling motion. You may feel the tightness in certain localized areas and may want to focus rolling over the tight spot. As you approach the hip, roll slightly over to roll over the TFL fibers which are anterior-lateral (front- outer side) on the iliac crest. We went through the Hamstrings stretch last week. Can Quadriceps stretch be far away?
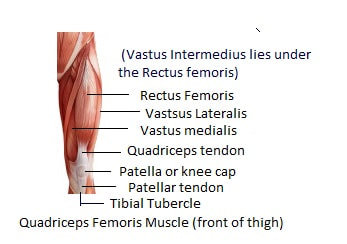
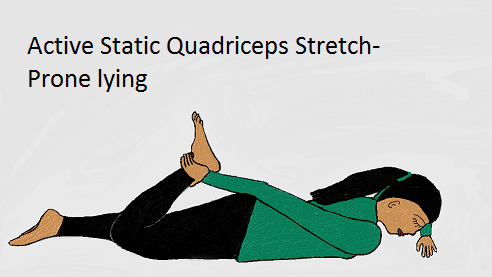
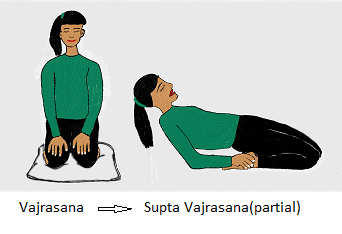
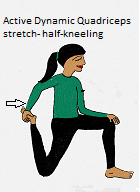
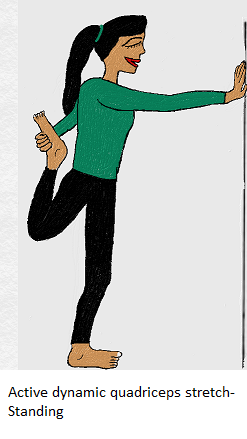
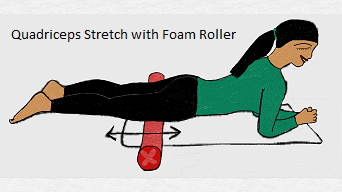
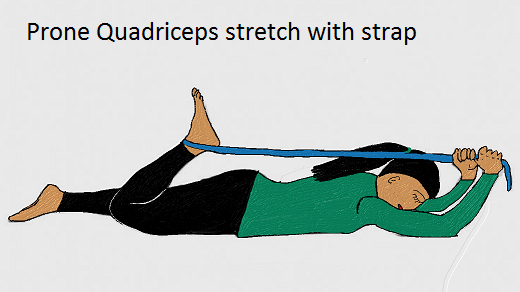
All right, here it is. • The quadriceps muscle is the major bulk of muscle you feel/ see in front of the thigh. • It is made up of the three vastii muscles and the rectus femoris. • The vastus lateralis, vastus medialis, and vastus intermedius originate from the femur bone. • The rectus femoris originates from the AIIS (anterior inferior iliac spine), a bony prominence of the iliac bone (to refresh, the ilium is one of the three pelvic bones, the other two being the ischium and pubis). • As the name suggest, the vastus lateralis is on the lateral or outer side of the thigh, the vastus medialis is on the medial or inner side of the thigh, and the vastus intermedius is a deep muscle that lies in between these two muscles in the middle of the thigh. The vastii are single joint muscles and their function is to straighten the knee joint or knee extension as it is termed. • The rectus femoris is a superficial and large muscle that lies over the vastus intermedius and portions of the vastus lateralis and medius. Since it crosses both the hip joint and knee joint, its function is to flex the hip joint and extend the knee joint. • Just above the knee joint, the above muscles unite to form a common quadriceps tendon. The knee cap is embedded within the quadriceps tendon and this continues as the patellar tendon (below the patella) to insert on the tibial (lower leg bone) tuberosity. • The vastus medialis obliquus (VMO) is part of the vastus medialis muscle whose short fibers run obliquely and plays a key role in patellar tracking and stabilization. As with any exercise, movement and stability are key, even with stretches. It is important to be aware of the dynamic postures as you attain and hold the stretch position. Repetition of good postures while stretching, lead to increased flexibility and general wellness. However, after achieving the increased range, it is imperative to incorporate the newly acquired movement in activities to develop motor control. Hence stretches should be part of exercise program and not just done as a stand -alone exercise. Another important point to be mentioned here is that muscles and soft tissue stretch better when warm, and warm-up exercise prior to deepening stretches help to achieve personal best. The different ways to stretch the Quadriceps are: (as usual we will consider stretching the right quadriceps for ease of understanding) 1) Passive stretch: this can be done in the prone position with the therapist flexing or bending the knee with the hip stabilized on the mat in neutral position. One arm stabilizes the pelvis, while the other flexes the knee joint till stretch is felt. The position is held from 5 seconds to 30 seconds (as long as possible) and released with 15-30 second rest in between. 2) Active static stretch: i) This stretch is similar to the passive stretch above in prone position and the person may actively bend the knee to feel a stretch in front of the thigh, while the pelvis is stabilized by the mat/bed. The right hand may grasp the right foot/ankle to deepen the knee flexion for further stretch. ii) One of the advanced yoga asana called the supta vajrasana effectively stretches the quadriceps with the knee in full flexion, while lowering the torso (back down) onto the mat. It is important to keep the knees on the floor and not allow them to lift up by flexing the hip joints. Also, the abdominals and back extensors co-contract to keep the spine stable and elongated. It is okay to rest on forearms if stretch is already felt in front of thigh. As you advance deeper into this pose, the shoulder blades lie on the mat with lumbar spine in minimal extension to neutral position. When the rectus or hip flexors are tight, it may cause anterior pelvic tilt and lumbar extension increasing the lumbar curve. So watch out for that and progress slowly. In case of anterior pelvic tilt of increased lumbar lordosis, prone position is ideal to stabilize the pelvis and prevent anterior tilt, till sufficient length is achieved in the quadriceps. 3) Active Dynamic stretch: i) Standing position near wall: With the pelvis neutral in standing position, extend the right hip while flexing the knee and hold the right ankle/foot with the right hand. The left hand may be used for support on wall if needed. ii) Half-kneeling position on mat or floor. A forward lunge in half-kneeling stretches the rectus femoris primarily, and may be modified to deepen the vastii stretch by further flexing the right knee while lifting the right foot off the floor. The right hand may be used to hold the right ankle/foot. It demands balance as well as stability at trunk and hip joints. 4) Stretch using tools/equipment: i) In prone position using a strap/gait belt: lie with face down on mat/bed with the strap or gait belt tied above the ankle and bend the right knee bringing the right heel to the right buttock. The other end of the strap/belt passes over the right shoulder and is pulled with the right hand to deepen the stretch. ii) In standing position near a wall, a stool can be used to rest the right knee. Position the left hand on the wall for support in front. Slowly flex the right knee as far as possible. A strap may be looped around the ankle with the other end passing over the right shoulder and using the right hand to pull down on strap to deepen stretch. iii) With the foam roller on the floor, lie on the foam roller, face down on the front of the thighs and rest the forearms on the floor. You may keep the legs straight while rolling the foam roll back and forth along the front of thigh in small segments or hold the position where you sense a tender spot and slowly flex and extend the knee, allowing the pressure from body weight to release the tightness Continuing with our stretch series from the ground up, we come to the hamstrings stretch.
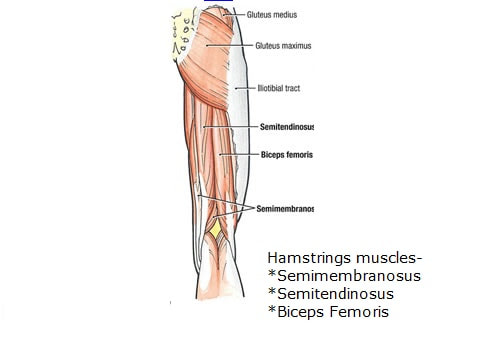
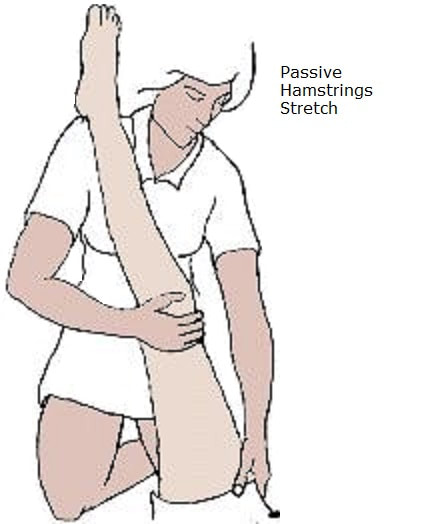
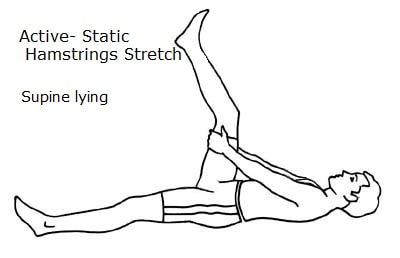
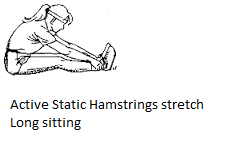
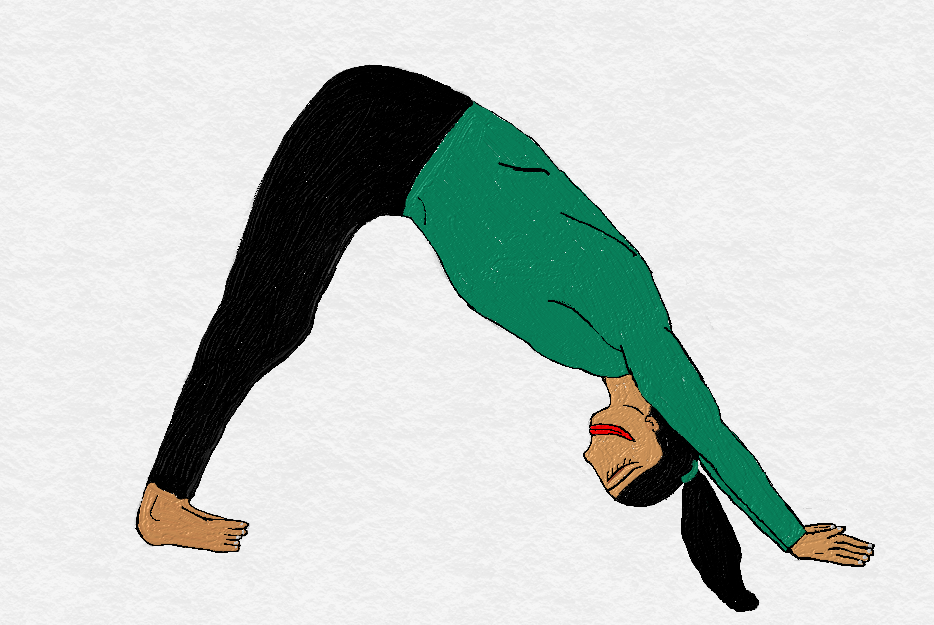
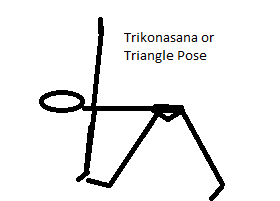
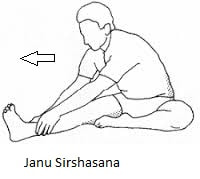
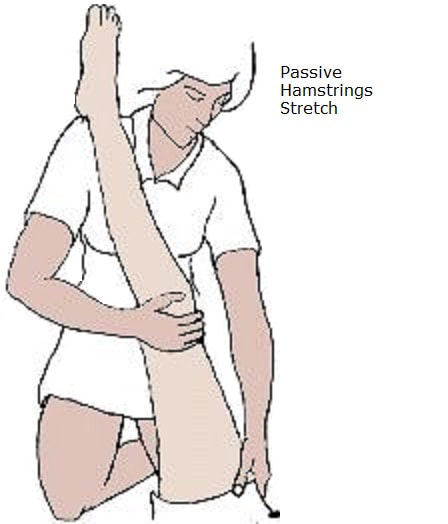
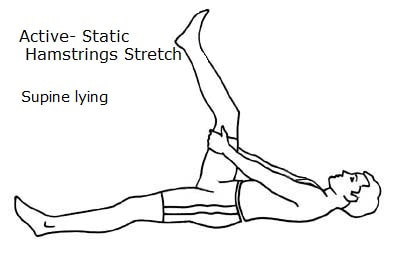
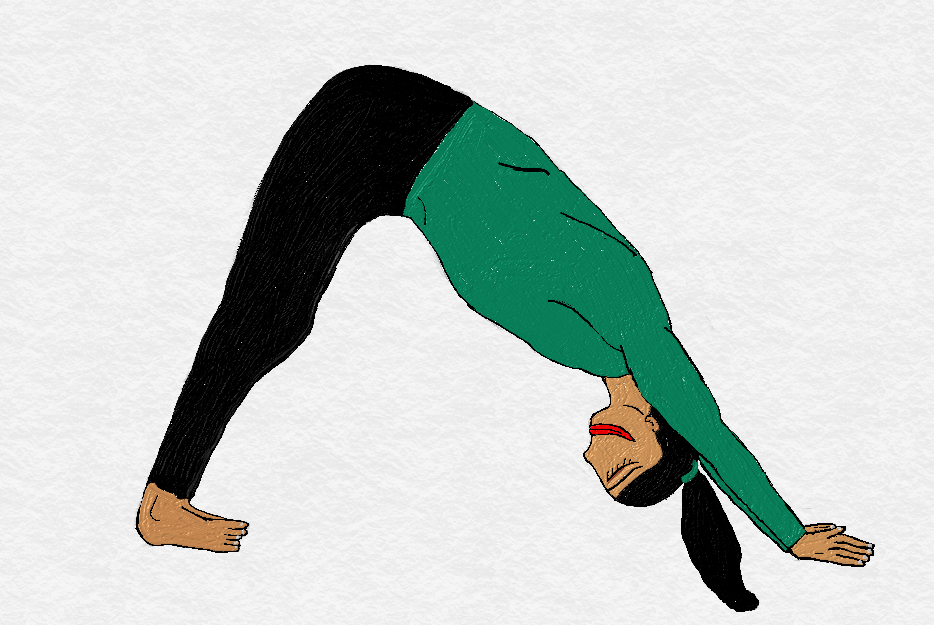
The hamstrings muscle forms the bulk of the muscle on the back of the thigh. It is made up of 3 muscles, namely the Semitendinosus, the Semimembranosus and the Biceps Femoris. • The semitendinosus, semimembranosus and biceps femoris long head, all originate from the ischial tuberosity or the “sit bone.” • Biceps femoris short head originates from the femur (thigh bone) from a prominent line called the linea aspera and the outer femoral condyle. • As the name implies, the ischial tuberosity is the prominent bony projection of the pelvic bone named ischium (pelvis is formed on each side by the fusion of ilium, ischium and pubis bones). • The Semitendinosus and Semimembranosus insert into the upper medial (inner side of leg) part of the tibial bone. The Semitendinosus with 2 other muscles (Sartorius and Gracilis) forms 1 of the 3 prongs of the duck/goose foot called the “pes anserinus.” • The biceps femoris inserts on the fibular head (lateral or outer side of leg). The hamstring muscle is a two-joint muscle (except the short head of biceps which crosses behind the knee joint only) and crosses behind the hip joint and the knee joint. The contraction of this muscle extends the hip joint and flexes the knee joint, therefore it stretches when the hip flexes with knee extension. It is prone to injury through overuse and strain including sudden athletic injuries playing various sports involving running or jumping. The various ways to stretch this muscle are: (for ease of understanding let us consider stretching of the right hamstrings in all the one-sided stretch positions) 1) Passive stretch: The patient /client lies in supine (facing up) position. The therapist or trained person lifts the right leg by flexing the hip and knee to 90-90 degrees. Then gently straightens the knee joint till a stretch is felt along the back of the thigh. The left leg should be resting on mat/floor in neutral position with a straight knee. 2) Active static stretch: i) This is done in supine position with the trunk supported and stable with pelvis resting on the floor/mat/bed. The left leg is in neutral resting on mat. Start by bending the right leg at hip and knee to bring it to 90-90 position as in above stretch. Hold the right thigh with both hands, just below the knee joint. Slowly, extend the right knee and straighten the leg as far as possible making sure the pelvis and hip is stable. A stretch is felt behind the thigh in the hamstrings muscle. Hold the stretch for as long as possible from 5 seconds to 30 seconds. Release the position by bending the knee and rest for 15-30 seconds. Repeat stretch 2-3 times. ii) Start in the long sitting position and reach for the toes to stretch the hamstrings while keeping the knee stable and resting on the floor while you move forward at the hip, flexing and stretching the muscle proximally at hip joint. Another way is to hold the feet with both hands by flexing the hip and knee, then slowly extending the hip and knee lowering the leg to the floor, while maintaining trunk position. This method keeps the proximal end stable and stretches the muscle/tendon distally, near the knee joint. 3) Active dynamic stretch: Some of the daily activities put this muscle in stretch position as in forward bending. A lot of the yoga asanas such as the mountain pose (parvatasana), triangle pose (Uthitta Trikonasana), forward bending head-to-knee pose (Janu sirshasana) are aimed at stretching the hamstrings. i) Mountain pose: Here both the hamstring muscles are stretched simultaneously. Begin in the quadruped position on a mat and bring the sole of feet to the floor by straightening knees and lifting the pelvis towards ceiling. Bring the head between the arms while gaze is fixed on knees, forming an inverted “V.” Hold the position while inhaling and exhaling completely, you can build up to multiple breath cycles. ii) Triangle pose: Stand with a wide stance feet pointing forward and knees straight with an upright, neutral trunk. Turn the right leg out 90 degrees at hip, so that toes are pointing to the right. Bring both arms up at shoulder level, head turned right, elbows straight, fingers straight, palms open and facing floor, gaze fixed on right thumb. Slowly lower trunk to right by bending at right hip joint and bring the right hand to the right shin. Slide the hand down the shin and bring fingers/hand to the ankle and possibly the floor. For final pose, open up at the chest by bringing the left arm up toward ceiling and rotating head to left for gazing at the left hand now. Hold the pose for 5 seconds to 30 seconds. Release by slowly bringing torso upright and rest for 15-30 seconds. Repeat 2-3 times. iii) Janu sirshasana: Sit up in staff pose or long-sitting position with palms on floor slightly behind the pelvis. Bend the left leg at hip and knee and place sole of left foot along the inner right thigh. Raise both arms up towards ceiling, elongating the spine and reach forward by bending at hip (torso is elongated throughout with minimal rounding of spine at the end of pose). With both hands hold the shin of right leg and slide down during the exhalation in breath cycle to deepen the pose for further stretch of the posterior chain tissue (including hamstrings). Take a deep breath in and hold position and slide hands further down at the next exhalation till you reach end position. You work towards being able to bring the head to right knee, with the knee straight and hands around the sole of right foot. Release pose slowly by raising torso to upright and bending the right knee. Repeat 2-3 times. 4) Stretch using tools or equipment: i) Sit upright on chair with a neutral spine and right knee extended with the foot supported on a stool in front. The left foot is resting on the floor. Keeping the right knee straight, reach forward by bending at hip joints and sliding hands along the right thigh down towards the shin. Spine/trunk should be elongated throughout. Hold for 5- 30 seconds, release and rest for 15-30 seconds. Repeat 2-3 times. ii) Lie on mat/floor with one end of a strap or gait belt looped around the right foot. Keeping left leg in neutral on the floor bring the right leg to 90-90 degree hip-knee flexion. Then holding the loose end of the strap in both hands, pull while extending the knee for stretch behind the thigh. Hold for 5 seconds to 30 seconds for as long as possible, release and rest 15-30 seconds. Repeat 2-3 times. iii) Foam roll stretch: place a firm foam roll on mat or on the floor. Sit with sit bones on the roll with both legs extended at knee joints. Bring both hands with palms on floor behind the foam roll. Bend the left leg bringing the foot to the floor in front of the foam roll. Gently roll the foam roller under body weight back and forth along the back of right thigh from the sit bone to knee joint. This being a long muscle, you can begin from the sit bone (proximally) and roll 2-3 inch segments of the muscle at a time, then move distally. Let us begin the series on stretching from the ground upwards. One of the most common stretches in the lower extremity is the calf stretch or the Achilles tendon stretch.
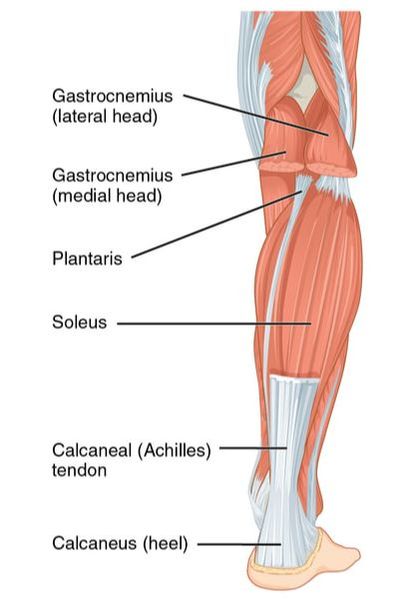
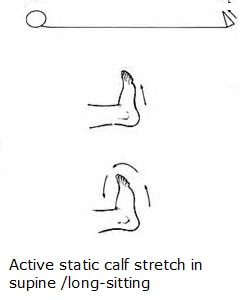
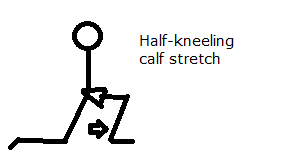
The Achilles tendon is made up of the gastrocnemius and soleus muscles, as they form a common tendon that inserts into the heel bone or calcaneus. • The gastrocnemius originates from the femoral condyles (medial and lateral heads) above the knee joint. • The soleus originates from below the knee joint, the fibular head and upper quarter of fibula bone, from the medial surface of tibia and parts of anterior muscular septum. • As the muscles progress to the heel bone, they transition histologically into anterior and posterior aponeurosis, which are whitish, flat broad tendon-like structures. • Eventually the aponeuroses transform to the tendon which inserts into the heel bone. The different ways to stretch the muscle are as follows: 1) Passive stretch: here the patient/client is in supine-lying on a mat or is in long sitting position. The physical therapist stabilizes the neutral knee with one arm and the other arm cups the heel with the therapist forearm supporting the sole of the foot. The distal arm is slightly extended at the wrist for ergonomic grip and with the body movement moves the foot upwards with the forearm to dorsiflex the foot. It is important to get an end-feel of the soft tissue stretching and hence a slow, gentle stretch is essential initially to determine the stretch force to be applied for optimal results. 2) Active static stretch- The patient/client is in supine-lying on a mat or in long sitting position with the knee in neutral position and well supported. The patient keeps the knee and leg stable and dorsiflexes the foot with the calf-muscle being stretched by pointing the toes upwards in the direction of the face/nose (“toes to nose” as it is popularly addressed), till a stretch is felt in the back of the lower leg or calf. This position is held for as long as possible from 5 seconds up to 30 seconds. Release stretch and rest the muscle for 15-30 seconds and repeat 2-3 times. 3) Active dynamic stretch- There are several ways to do this. For example to stretch the right calf: i) The patient/client is in half-kneeling position. The right foot is in front, resting on the floor, with knee and shin of the left leg resting on the floor. With the trunk upright and neutral, stabilize it as you flex the hip and knee of the right leg. The foot should be flat and firmly rooted to the floor as the body weight shifts onto the leg. This brings about dorsiflexion of the right foot, as the tibia/lower leg moves forward over a stationary foot on the floor, stretching the soleus primarily. ii) In standing position, with the right foot behind and toes pointing forward both feet, lean forward from the ankles, keeping the right knee straight. This can be done while facing a wall. The left leg must allow hip and knee flexion as body weight (body moves as one unit from ankle up) moves forward maintaining a firmly planted right foot behind with the heel on the floor. It is ok to lean forward and rest the open palms on the wall. iii) Another way to stretch the right calf in standing is to stand facing a wall. Bring the right foot and place the ball of foot on wall with the heel on the floor. Make sure to move the ball of foot as far up as you can by inching it upward along the wall, with the heel still on floor. Lean forward towards the wall deepening the stretch at the calf. 4) Stretching with tools or equipment: i) Stretch using a strap or thera- band- in the long sitting position, loop a long strap or sturdy thera-band around the sole from mid-foot to ball of foot. Hold the two ends of the strap/band in hands. Gradually pull up the strap, thus dorsiflexing the foot and stretching the calf muscles. ii) When seated on a chair with hip knee flexion and left foot on floor, you can use rocker board placed on floor with right foot on it and push the right heel to floor, thus tilting the rocker board up and dorsiflexing the right foot. I will broach the topic of stretching in detail and then eventually take up specific muscle stretches over the upcoming weeks.
In my post on stretches on September 2nd, 2016, I mentioned stretches can be either “informal/ spontaneous” or “deliberate.” In physical therapy, we are concerned with deliberate stretches with a goal in mind. Stretches lead to increased flexibility of soft tissue. Though it is widely thought that it is a muscle being stretched, there are a lot many tissues in addition that are stretching (like fascia, nerves, blood vessels and connective tissue), to allow increase in flexibility or mobility at a given joint. The tensile strength of various tissues varies based on their elastic property, muscles, being the most flexible and elastic amongst these. It is important to realize, just as the tissues have varying properties and abilities, so do we. And while 10 degrees of motion for one allows him to work happily, doing what needs to be done in the course of the day, for another, 20 degrees may be required to achieve smooth execution of daily activities. Whatever is your requirement, with the above in mind, go slow with stretches, do multiple repetitions with holds and enjoy! Yes, you read that right, ENJOY! Stretches do not have to be painful or cause soreness. With the right effort and willingness, they can be an enjoyable activity. As long as you are doing what you need to, happily, no aches and pains associated due to tightness or stiffness, you are doing good. The mechanism for muscle stretch can be seen from physiological or biomechanical perspective. Some of these are: • Local stretch reflex acclimatization- The local stretch reflex is a mono-synaptic reflex and is hence a very quick response to muscle being stretched. The muscle spindle in muscle sends signal to spinal cord, which then sends response signal causing the stretched muscle to tighten or contract to prevent overstretch or sudden tear. So it is a primitive, protective mechanism. When the stretch is gradual and prolonged, the muscle spindle gets “acclimatized” to stretch and decreases the firing intensity, thus allowing the muscle to be stretched further. • Reciprocal inhibition- Muscles around a joint exist in an agonist/antagonist relation. When the agonist muscle contracts, the antagonist muscle relaxes to allow movement to occur at the given joint. This is a primitive spinal cord reflex as well. • For example the quadriceps (quads) and hamstrings (hams) at the knee are in such a relationship. When the quads contracts, the hamstrings relaxes to allow the knee joint to straighten. While stretching the hamstrings, when quads are engaged at end of stretch, it allows deepening of stretch through reciprocal inhibition of hamstrings. • Proprioceptive neuro-muscular facilitation (PNF) - this is a technique in which brief contraction of muscle being stretched (at end of stretch) increases tension in muscle tendon junction where Golgi tendon organ is situated. The Golgi tendon organ (senses tension in muscle) sends signal to stretched muscle to relax with resulting slack (like a circuit-breaker) in muscle and thus facilitates voluntary deeper stretch. Stretches can be done in various ways: 1) Passive: when a muscle stretch is done by your therapist or anyone else trained to do so, and you are doing nothing, such a stretch is passive. This stretch may be used to demonstrate what a muscle being stretched feels like so that you experience the right stretch. Sometimes, it may not be possible for you to stretch, as in after surgery or your doctor may want you to have a passive stretch. During passive stretch, holding gentle prolonged stretch and deepening the stretch gradually over 30 seconds to 2-3 minutes, increases efficacy of stretch by causing the local stretch reflex to decrease intensity due to acclimatization. Think of it as a learning phase, wherein the right experience increases awareness. For example a passive hamstrings stretch. 2) Active stretch: here you are putting in some muscular effort to bring about a stretch. During active stretch, acclimatization of the local stretch reflex as well reciprocal inhibition or PNF can be employed to deepen the stretch. Active stretch can be: i) Static, wherein most your body is well supported and by holding one end of muscle insertion stable or steady, you are stretching the soft tissue by moving the other end of muscle insertion away. The focus here is on the tissue being stretched. Think of it as a skilled single-task performance. For example, a static hamstrings stretch in supine position. ii) Dynamic, wherein you are in a posture simulating the lacking activity or any activity which demands the additional flexibility and it involves movement of the joints which the muscle crosses, while maintaining stability in other joints and postural balance. Think of it as a skilled multi-task performance. For example, a forward lunge, hip flexor stretch on floor/mat. 3) Stretching with use of tools: These are self-myofascial release techniques using tools like the foam roller, tennis balls, thera-belt, thera-cane, and so-on. Think of it as a person skilled in the tools of trade with ability to employ tools successfully for desired outcome. For example, IT band stretch on foam roller. Moving upwards or from ground up in our gait consideration of body segments and their role while walking, this week calls for detailed look of the trunk. The trunk appears very stable with relatively less movement during the gait cycle, and so it appears that the trunk is less active, however this is not the case. The noteworthy activity in the major trunk muscles in harmony with the lower extremity muscles is responsible for the appearance of subtle movement and evident stability.
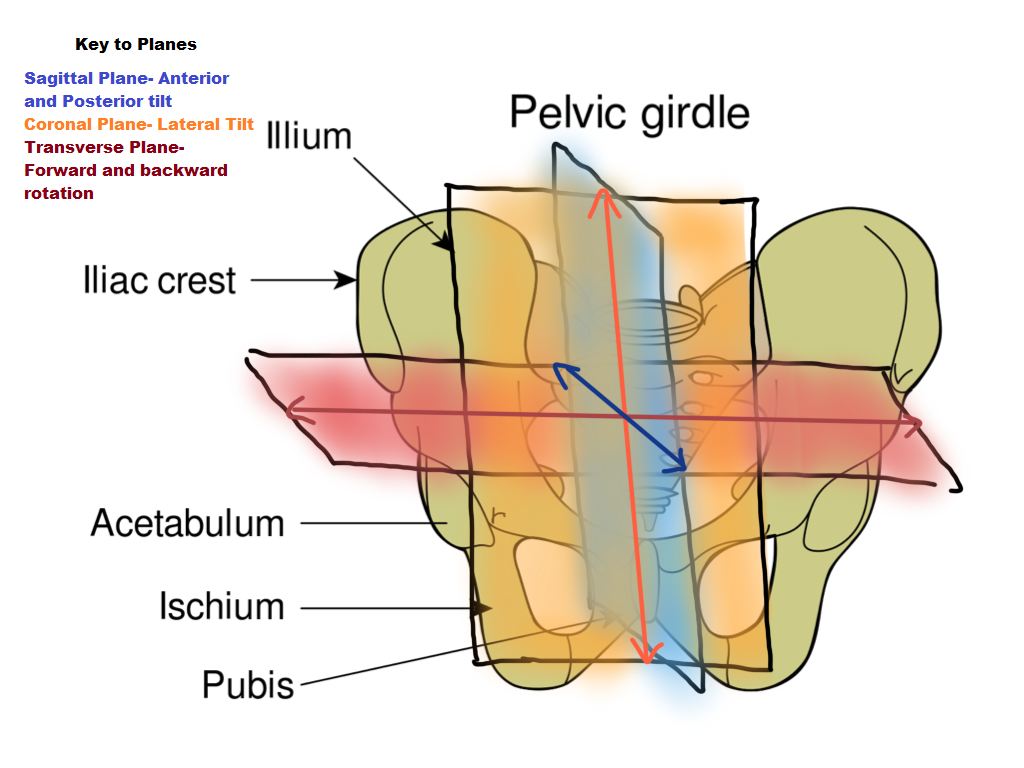
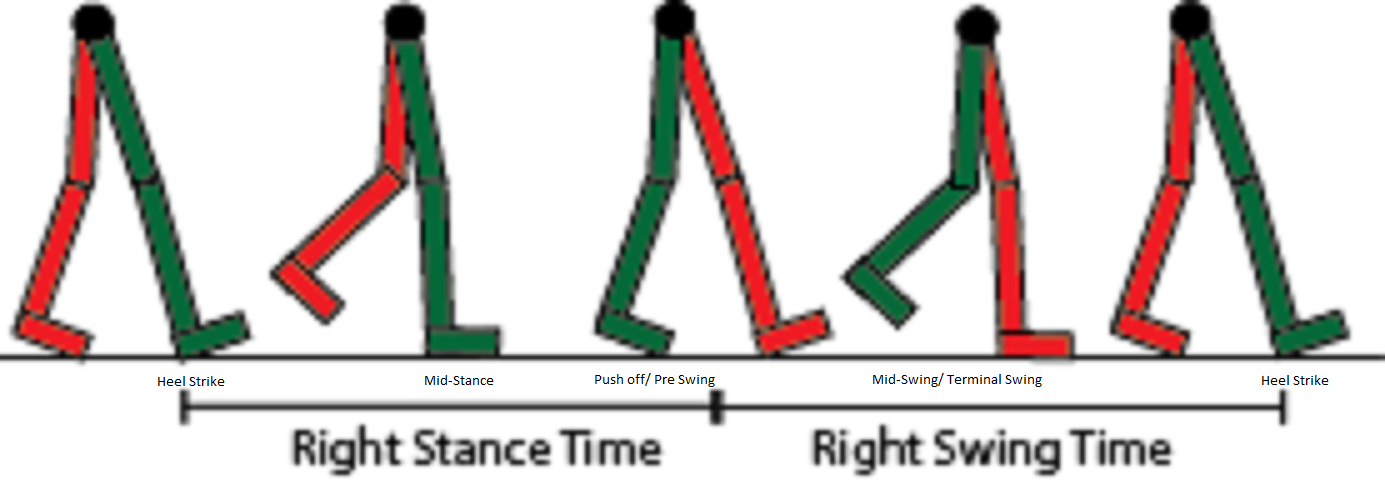
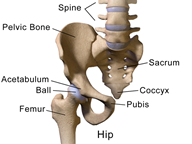
The last post mentioned that the pelvic bone is made up of three bones which are fused together. Namely the ilium, ischium and pubis bones. In the channel of weight transfer, the spine is closely linked to the pelvis for continuity. The sacrum which is the lower part of the spine is made of five fused vertebrae and it forms a very stable and well supported joint (supported by muscles and ligaments) with the pelvis(ilium) and hence is known as the sacro-iliac joint or SI joint. The weight transfers from the spine to the pelvis via sacrum to ilium and from pelvis to femur (lower extremity) via the hip joint. Here it is important to mention two regions of the skeletal system-namely the lumbo-pelvic region (lumbar spine is highly mobile) and the pelvic-hip region (femur at hip joint is highly mobile). The strong muscular and ligamentous support in these regions are key to stability during weight transfer in the gait cycle. The former allows the weight transfer from a stable spine to the pelvis and the latter from the pelvis to the stable lower extremities. When you go to the physical therapist and are working on your core, it mainly concerns the stability in these two regions through the integrity of the supporting ligaments and strength of the surrounding musculature. See how it is all connected so immaculately? We have considered the major muscles of the trunk and hip in earlier posts and I will refresh those briefly: 1) Abdominals- rectus abdominus, internal and external obliques and transversus abdominus 2) Back Extensors- multifidi and semispinalis and extensor spinae 3) The hip extensors- 3 gluteii which extend and rotate the hip and proximal hamstrings 4) Hip flexors- iliacus, psoas, rectus femoris, sartorius, gracilis, pectineus 5) Hip adductors- adductor magnus, adductor longus and adductor brevis 6) Hip abductors- Gluteus maximus, gluteus medius and gluteus minimus and Tensor Fascia Lata There is motion of the trunk and pelvis in 3 major planes which I have considered in detail in an earlier post. They are: 1) Transverse plane which is parallel to the ground (forward and backward rotation of pelvis happen in this plane along a vertical axis) 2) Sagittal plane which divides the body into left and right halves (anterior and posterior pelvic tilt happens in this plane) and 3) Coronal plane which divides the body into front and back (lateral tilting of pelvis happens in this plane) Now let us consider the pelvic and trunk movement and muscle work during the gait cycle. • In the transverse plane: at right heel strike, the ipsilateral (same-sided) pelvis is forward in the transverse plane along a vertical axis in the direction of progression. The trunk, however, in order to conserve energy and for maximal efficiency, must stay facing in direction of progression and not follow the right leg. That is the trunk rotates to the left or swing side during single leg support and then comes to neutral at right leg mid-stance, then it rotates to right side, till the next right single leg support. That is, muscle contraction from right(ipsilateral) back extensors keep the spine upright and in direction of progression while the bilateral obliques co-contract as do the transverse abdominus and multifidi for stability. The passive left arm swing occurs in response to momentum generated and it contributes to keep the upper trunk from rotating towards the right (weight bearing) limb. • In the sagittal plane: The gluteus maximus and ilio-psoas maintain pelvic stability, as the hip flexes and extends at heel strike and push-off, respectively. The pelvis posteriorly rotates at heel strike, then goes to anterior tilt quickly and slowly returns to posterior tilt again for next heel strike. • In the Coronal plane: at right heel strike, with impact, there is lateral trunk flexion to the right. The gluteus medius on right contracts as left leg goes into swing phase, thus preventing the pelvis from dropping excessively laterally towards the left side when the left foot is off the ground (swing phase). Although there is a mild list of pelvis to swing leg in order to keep the COG from rising excessively. As we know, the center of gravity moves in a figure of eight pattern “∞.” This means that it rises and drops vertically as it progresses forward. Gait is efficient with least movement of the COG. At early and late stance, it drops towards the ground and is at the highest during the mid-stance phase of each leg. All this muscle work just ensures, the vertebral column stays stable in as near neutral as possible and gets a ride over the mobile lower extremities, thus conserving energy. Going back to gait this week, the earlier 2 posts on gait covered 1) the gait cycle and phases and 2) the role of the foot during gait. This week let us look at the role of the hip and knee joints and the rest of the lower limbs.
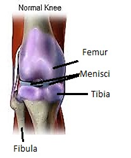
The lower extremities are made of the thigh which is the femur bone and lower leg which is a syndesmoses (immovable joint connected with connective tissue) of the tibia and fibula along with all the muscles and ligaments and the soft tissue which includes the blood vessels, nervous tissue, and fascia. The hip joint is formed by the head of femur with the cup shaped acetabulum formed by fusion of the three pelvic bones (namely the ilium, ischium and pubis). The acetabulum is deep and is further deepened by a cartilage called the acetabular rim. This gives the hip joint a great deal of stability as is needed by a weight bearing joint. The lower end of the femur is made up of two condyles (round protuberance of bones) which is received by the shallow concavity of the “tibial plateau.” This is the knee joint. Here again the articular or joint surface of the tibia (tibial plateau) is deepened by articular cartilages. These are the menisci - two in number and called the medial meniscus and lateral meniscus- based on their position. The menisci form the weight bearing surface of the knee joint. When we walk, there is simultaneous mobility and weight bearing at the knee joint, which makes it important for menisci to have some mobility so as not to get trapped within the joint during time of weight transfer or impact (running, jumping), since its major role is to deepen the sockets and provide cushioning effect or shock absorption and even distribution of the weight. Both the hip joint and knee joint function and stability are enhanced due to the presence of muscles and ligaments. The buttock is made of the 3 gluteii muscles (maximus, medius, and minimus). The hip flexors like iliacus, psoas, sartorius, and rectus femoris pass through the groin area. The major muscle that forms the bulk of the anterior thigh is the quadriceps. It ends in a tendon which crosses the knee joint in front and within which is embedded the knee cap or patella. The role of the knee cap is to increase the efficiency of the quadriceps. The main muscle at the back of the thigh is the Hamstrings. Both the quadriceps and hamstrings are made up of a group of muscles. The bulk of muscle in the calf or back of lower leg is Gastrocnemius and soleus. It inserts into the heel bone (calcaneum) of the foot and is responsible for the effective push-off. The front and sides of the lower leg consist of muscles that support the arches in the foot and produce necessary movement for weight transfer on foot. Now let us consider the gait cycle. During the stance phase, the hip is flexed at heel strike and gradually moves to neutral position as body weight moves over a stable foot, and ends in hip extension (actually 10 degrees of “hyperextension”- this comes from lumbar extension) just prior to push-off, at which point it begins flexion together with knee flexion. The maximal hip flexion (30 degrees) occurs during the swing phase to enable the foot to leave contact with the ground and “sail across” space so that the body translates forward and “covers ground.” The knee joint is in neutral or about 5 degrees of flexion at heel strike and it flexes slightly (15 degrees) in order to absorb the impact of initial contact with the ground and in preparation for weight bearing as the weight shifts to stance foot. This also brings stability by lowering the center of gravity of the body closer to the ground. The knee then gradually extends for joint stability at mid-stance for weight bearing and beginning of terminal stance when body progresses forward. At push-off (end of terminal stance), the knee flexes with the hip and attains about 60 degrees of flexion at peak swing, then begins relative extension towards heel strike. At heel strike, the anterior tibial muscles are contracting to keep the foot in dorsiflexion and as they do so, it pulls the proximal end of the tibia forward, bringing the knee into flexion for shock absorption. The hip is stabilized and thrust forward by a strong contraction of the gluteus maximus and adductor magnus. The quadriceps begin to extend the knee and as the body progresses forward over a stable foot, the gluteus maximus contracts as weight bearing occurs at mid- stance and continues into terminal stance phase, progressing the body forwards. The iliacus and hamstrings bring about hip and knee flexion respectively for the push-off phase and swing phase. The limb then goes into deceleration as it prepares to go into the subsequent heel strike and the cycle continues seamlessly. This week at the regular weekend yoga classes my husband and I attend, the instructor mentioned injuries that occur during yoga or any other form of exercise one may take up in a class or group setting.
It is intriguing and thought provoking that he mentions injuries could occur while doing any form of exercise and not only yoga, when done incorrectly. I would like to share some of my thoughts on the matter. Human body is an amazing instrument or machine as some call it. When we make or read such a statement, it implies, the inhabitant in the body is other than the body itself. When we are able to look at ourselves from this perspective, things become so much clearer, and we become more diligent and caring when working with the body. Usually we take the body for granted, though let us step back for a moment and look at it from a new perspective. What if we are the caretakers of this instrument? Precisely like a skillful musical artist tunes the instrument and plays it to produce the most melodious music entering our ears, we too must treat the body with utmost care and diligence and hence learn to master it and tune it so it would “listen”. Fancy as the words sound, all it means is to consider all work as worship and to do our undertaking with utmost diligence- that includes exercises or yoga asanas. When done with this perspective, we embark on a journey with a clear goal in mind and work our way through any difficulty that may arise with open mind. To illustrate this point, I will consider an example. Let us say we are doing Surya Namaskar, and during the process we are becoming aware of our abilities. However, we wish to be : 1)more flexible in order to deepen our poses or 2) increase endurance (activity tolerance) to stay in certain pose for longer period or 3) improve control to execute the transition smoothly and slowly. Whatever the goal, going about it diligently day after day is important, in other words persistence. Once the goal is set, “I will and I can” is of prime importance in our journey to “I am”. The way is always through and never around or over. Going back to the example let us take up the hasta padasana or forward bend pose:- • Deepening the posture requires flexibility in the hamstrings. How to achieve this? Say to begin with the fingers tips barely touch the floor. One good way is to start by bending the hip and knee joints in order to reach the floor with the pads of fingers or palm. Then slowly straighten knees till stretch is felt in hamstrings and hold for 5- 10 seconds. Repeat 3-5 times/ session and at least 2-3 sessions/week. You can ensure engaging of the quadriceps and rectus abdominus, which allows the reciprocal inhibition of the hamstrings and back extensors and deepens the pose even if by a millimeter or a fraction thereof. Done steadily and slowly, it impacts the flexibility and you will notice that centimeter of increased bending over a few weeks or months. • In order to increase endurance or holding the pose longer, breathing techniques are of prime importance. As always, forward bending is deepened when breathing out and holding complete exhaled phase. • In order to make the transition smooth and slow, again breathing technique is important. In this case, the focus is on prolonging the inhalation, hold and exhalation phases. This gives greater opportunity to execute smooth movements within the existing range. Also pattern deviations are identified and worked upon easier with slow movements. The body communicates with us and if a pose is done incorrectly and you are “tuned” with the body or possess heightened awareness of it, it can be identified as a discomfort. Conversely if a pose is executed well, there is flexibility and a sense of well-being through release of endogenous hormones like endorphin and enkephalin. This awareness and observation translates into all that you do during the day and you will find yourself paying greater attention to details in any task you undertake. So does the diligence you bring in with an open mind. Then as it is said, “Sky is the limit”. Not only does this simple practice keep injuries away, once mastered, it enables you to be the best of yourself in any undertaking. Through skilled physical therapy techniques, increase your awareness and tune in to the body. Contact Stablemovement Physical Therapy through facebook page or visit us at www.stablemovement.com Last week we saw an overview of the gait cycle. The basic phases in gait cycle and the fundamental components of the stance and swing phases. The subsequent week’s post will consist of elaborating the biomechanics of the various joints in the lower extremities and the trunk.
We will consider the body from the ground up or from the foot to head. The foot is made up of 26 bones and 33 joints! Though the amazing fact is it works flawlessly as one unit. While it will be boring to consider all the joint movements, it is good to know that the foot moves in multiple planes ensuring smooth transfer of weight from the heel (calcaneum) to the toes (phalanges). The major foot movements include lifting up at heel strike, pushing back at push-off phase, as well as the subtle rotational motion (pronation-supination) during weight transference from heel to toes. The ankle joint is formed by the two lower leg bones (tibia and fibula) with the foremost tarsal (seven tarsal bones in all) bone called the talus. The two leg bones form an inverted cup shaped cavity which is deep and houses the head of talus. This cavity is also known as the ankle mortise and is responsible for the stability of the ankle joint. The ankle joint is a hinge joint and the only movement possible here is upward (dorsiflexion as in heel strike) and downward (plantarflexion as in push-off) movement. The side to side and rotational movement during weight transfer occurs at the tarsal and metatarsal joints. The heel bone or the calcaneum is the largest bone in the foot. At heel strike the heel bone is everted, that is the heel lands on the outer edge. This is the initial impact of landing at heel strike. The initial impact is absorbed by pronation in the foot when the talus rotates antero-medially allowing the leg bones (tibia and fibula) to come into weight bearing position, to transfer the entire body weight to the foot. The anterior leg muscles like the tibialis anterior, the extensor hallucis longus, and extensor digitorum slowly lengthen permitting smooth lowering of the foot to the ground. As the knee flexes and weight is being transferred to the foot, it initially pronates or winds for impact absorption and then unwinds or supinates to allow maximal contact of foot with the ground (early stance). The transverse tarsal joints (talo-navicular and calcaneo-cuboid) are loose and accommodate the foot to uneven terrain. At mid stance, the body moves over a stable foot and the weight gradually shifts to the forefoot from tarsals to the five ray-like metatarsal bones (mostly 1st-3rd metatarsal rays). Here the arches with their muscular and ligamentous support are very important for weight transfer. The posterior leg muscles like the tibialis posterior and the peroneus longus are key muscles locking the transverse tarsal joints hence making the foot into a rigid lever. The foot continues supination as the heel lifts off the ground and the ball of the foot (1st metatarsal head) bears most load during the end of push-off phase. The Achilles tendon, which initially lengthens, now has sufficient potential energy to propel the body forward with a strong concentric contraction. Amazing isn’t it? The subtle movements in the joints of the foot, the display of combination of stability as well as mobility and the impeccable timing with which this is executed (considering average walking speed of adult is 100-115 steps/minute!) [For ease of understanding, here is a list of the bones in the foot: 7 tarsal bones: talus, calcaneum, navicular, cuboid and the 3 cuneiform bones 5 metatarsal bones: five rays one of each leading to the corresponding toe 14 phalanges: 2 in the big toe and 3 each from the 2nd to 5th toe.] For a long time, before the advent of gyms and even today, walking is one of the most popular forms of exercise. The easiest and most enjoyable, hands down winner with no equipment needed, only willingness.
There is a lot of propaganda nowadays on the right kind of footwear, on trendy outfits to exercise, even water bottles that match to quench the thirst while walking. While it is true that the right kind of footwear may alleviate or mitigate certain symptoms, it is but a tool to make the walk comfortable. Great and in vogue as these paraphernalia sound, these are just additions which take away from the simple joy of walking carefree. We take walking for granted. Have you ever found yourself thinking: “Now I must step forward with the right foot, now the left” or “I must place the right foot 6-8 inches forward,” or “I need to push with certain force to propel forward for the next perfect step?” They all sound absurd, don’t they? Yet your body knows exactly what to do when walking for equal steps every time. However what is also wonderful about the human being is the ability to bring any task into full awareness in a moment’s notice. So here is a physical therapists perspective on what is called “the gait” aka walk. I bet all of you must have observed, walking consists of a pattern or a series of events that repeat themselves. This series of events from a certain point to the consecutive similar point is what constitutes the “gait cycle.” So for example, from the left heel making contact with the floor, to the next time the left heel comes into contact with the floor is one complete gait cycle or stride, and this keeps repeating itself for the duration of walk. Half of this cycle, that is from left heel strike (or contact), to right heel strike is a step. Now it may seem like it is the legs that do most of the work during walking. This is only partially true. The trunk and upper body also play a big role to ensure that the body moves forward and stays in the forward facing direction all the time. While the pelvis turns, the trunk and shoulder girdle stabilizers are silently working to maintain a constant direction. The arms also swing to balance the forces generated in the lower limbs to make this possible. Phew! Who knew?? Maybe the next time you walk, your awareness of this profound activity will increase. At all times while walking, one foot is always in contact with the ground. This is what makes walking a unique activity. There may be parts of the cycle when both feet are making ground contact. For example, when the left heel strikes the ground, the right foot is pushing off (this is an example of both feet in ground contact) and when the left foot is loading and accepting the body weight, the right foot is in swing phase (off the ground and hence an example of one foot in contact with the ground). During one of my earlier posts and the presentation at New Seasons Market, I have mentioned the center of gravity of the body (COG) and the base of support (BOS) and the relationship between the two. Walking displays a wonderful working relationship between the two where the COG translates in a horizontal figure of 8 pattern, that is “∞”. This motion is extremely smooth and graceful, no jerks or sudden change in direction and it is in this smooth transition that an entire gait cycle is completed. Noteworthy is the fact that, even when one foot is pushing off and the other is simultaneously making heel contact, balance is maintained with utmost poise (grace) even though the BOS seems small and precarious (a few square centimeters only!). Ah! The reverence we now feel for this simple form of exercise is mind blowing. Let us delve into further detail and look at one complete gait cycle. The foot in contact with the ground is in stance phase, the foot off the ground is in swing phase. These two occur simultaneously. Three main components of stance are: 1. heel strike or initial contact with ground 2. foot-flat or mid-stance also the phase in which load is accepted by the leg 3. push off or terminal stance. The swing leg is also going through three components: 1. early-swing, when the foot has just lifted off the ground 2. mid-swing, when the foot is smoothly sailing forward 3. terminal-swing, when the foot is preparing to make contact with the ground. Putting the two phases together, the left foot is in heel strike as the right foot is going from push-off (the double leg stance phase) to the pre-swing phase. As the left leg accepts the weight, the right leg is off the floor or in early swing (single leg stance phase) then into mid-swing as the body is propelled forward and in the final phase the left foot pushes off as the right foot enters from terminal swing and into heel strike. As observed earlier, there is a brief moment when both feet are in contact with the ground. This is half a cycle or step and is repeated on the contralateral side, that is the right foot is now in heel strike with the left foot entering swing phase from push-off and this repeats itself till the point where the left heel comes to strike once again, completing one stride or one complete gait cycle. And this is just a very basic overview of the gait cycle. It may sound like a very romantic affair… and why not? Valentine’s Day is just round the corner. Fall in love with yourself, one step at a time, every time as you explore the wonder that you are with StableMovement Physical Therapy. For more information, find us at: www.stablemovement.com or call (408)252-8790. Ah! Finally we come full circle and to the twelfth pose in Surya Namaskar. The series started in November (18th November, to be precise), comes to an end with this weeks’ post.
The 12th asana or pose is the pranamasana, which is basically tadasana with the hands folded in a “namaste.” • Posture: From the 11th pose or the backward bend, bring the two arms down with elbows bent and the hands joined together in “Namaste,” and thumbs close to your heart. Simultaneously, bring the spine to neutral from a backward bend/ extended position and roll the pelvis to neutral as the hip joints revert to neutral. The spine should be elongated as in imagining a string pulling upwards from crown of head. The lower extremities are relaxed with neutral position of knee and ankle joints as the weight is effortlessly transferred. The shoulder blades or scapulae are pulled back. Simply put, stand tall with open chest and folded hands. To add challenge, you may bring both the feet together with the big toes and heels touching each other. This really activates the trunk and leg muscles to maintain balance. • Muscles: The shoulder extensors, adductors, internal rotators, the elbow flexors, and wrist extensors are the prime movers, bringing the arms into Namaste position. The rhomboids, levator scapulae, and the pectoralis minor rotate the scapula down to neutral from upward rotated position. The rectus abdominus and the gluteus maximus contract to bring the spine and pelvis to neutral. The stabilizer muscles (transversus abdominus, obliques, multifidi, and the piston action of diaphragm with pelvic floor muscles while breathing) of the trunk are activated to maintain neutral, elongated spine. • Breathing: Slowly exhale as you come into neutral from the backward bend position, coming to maximal exhalation at end posture. Stay in this pose with eyes closed, breathe in and out several times, holding the breath after a complete inhale and a complete exhale. “Om Bhaskaraya Namaha” “I bow to Him who is the cause of luster.” When I began the post series on Surya Namaskar, I wrote: “ Not only is it important to do the 12 postures with accuracy, but also the performance must exude tremendous grace throughout, including a smooth transition from one posture to next.” With this post, I conclude the Surya Namaskar series. Though I have done my best to put in words and simple sketches what is a very sacred exercise and way of being, words are not enough to express it in entirety. At some point, I would like to do a live session in the community and call on you all to participate in any way you are willing. Please look out for the dates and venue. The eleventh pose in Surya Namaskar, is the backward bending pose or the hasta uttanasana.
• Posture: From the forward bend or the hasta padasana (10th pose), begin by lifting torso up along with the arms to upright position with the arms extended up overhead, and continue further into a backward bend. The palms face inwards towards each other or forwards, the elbows are extended as the shoulders move to end range of flexion with the arms outstretched throughout the motion. To add grace to movement, the shoulders may be circled (circumduction) to reach end position with upper arms slightly behind ears. This allows the shoulder blade to go through a motion from protraction to retraction and full arc of upward rotation to allow overhead position of upper extremities. In addition to the shoulder blade (scapula), and the shoulder joint, the less mentioned collar bone (clavicle), the breast bone (sternum), and the rib cage all contribute to this wonderful motion. The spine from the lumbar-sacral junction to the cervical vertebrae is in gentle flexion in forward bend and goes to neutral and then a gentle backward bend, with the spine in stable and elongated posture. The sacrum moves very little (or not at all) during this motion (from slight nutation to neutral and into counter-nutation). This is the key to permitting a uniform curve in the spine, both in end flexion and end extension posture and keeping the lumbar spine stress -free. (A sharp fold in the skin of the back indicates an unhealthy backward bend with excessive extension between a particular inter-vertebral joint, instead of a healthy uniform curve). Initially, the body weight shifts forward with the legs moving forward as a unit at the ankle joints as it translates the body forward, the pelvis tilts backwards with the hip joints extending in a close-chain movement and a counter-nutation of the sacrum( top of sacral bone moves backward and down). • Muscles: In the bends it is essential to have good flexibility in the hip flexors for a backward bend (and the hamstrings for a forward bend). These allow the pelvis and sacrum to move freely releasing the stress on the spine. If these muscles are tight, it prevents movement of the pelvis and puts excessive strain either on the sacro-iliac joints, the spine, or both. As the dorsiflexors contract, translating the body forward as a unit, the calf muscles lengthen (eccentric contraction) to allow smooth and controlled movement. The quadriceps keep knee in extension and pull knee cap upwards to allow movement of leg as a unit. At the same time the hip extensors (gluteus maximus and hamstrings) contract with a resulting posterior pelvic tilt. The erector spinae and quadratus lumborum bring about spinal extension with the semispinalis (also a back extensor muscle). The gluteus medius and TFL may be engaged to allow the pelvis to open and sacrum to move easily. In this case, the adductors balance the outward torque. The shoulder girdle goes through the range of motion with the help of serratus anterior and rotator cuff muscles, which stabilize the shoulder blade and shoulder joint respectively. The prime movers like the upper, middle, and lower trapezius muscles, the deltoids, and the levators complete the arc. • Breathing: From complete exhalation in forward bend pose, slowly inhale while breathing in and expanding the chest all around at the base, mid area, and at the upper chest using the accessory muscles of breathing and filling air into the upper lobes of the lungs. Hold breath in at end of pose. “Om Arkaya Namaha" “I bow to Him who is fit to be worshipped” The tenth pose in Surya Namaskar is the forward bending pose or the hasta padasana (as in the 3rd pose).
• Posture: From the ninth pose or the ashwa sanchalanasana, bring the right foot forward and next to the left foot, simultaneously as you extend or straighten the left knee, to come into standing position. The hands stay on the floor as they are, on either side, with the feet in between. When the flexibility in the posterior chain of soft tissue (the calf, the hamstrings, gluteii, latissimus dorsii, quadratus lumborum, spinal extensors and thoraco-lumbar fascia) is good, the palms of hands may rest on the floor, with the elbows in extension or even some amount of flexion. When the flexibility in the afore-mentioned soft tissue is not so good, one may need to stretch out fingers to reach the floor or perhaps is unable to reach floor. In this case, it is alright to slide hands along the front of legs as far down as possible. With increased hamstrings flexibility, the pelvis rotates forward as the hip flexes, and with sacral nutation( forward tilting of sacrum) , most flexion should occur at hip joint with the abdomen as close to the thighs as possible. The spine should be elongated. When excessive flexion occurs in the lumbar and upper thoracic spine, with a “kyphotic” T-spine, or overall curved spine(C-shaped), the hip joint is/are(one joint /both joints) not flexing much and abdomen is further from the thighs. This calls for stretching of the posterior chain of soft tissue or increasing hip flexion mobility (close-chain movement with acetabulum rotating over a stable head of femur). In case of less flexibility, one may begin with the knees in some flexion in order for hands to reach the floor, and then reverse the movement by extending the knees to stretch the posterior chain. In the final posture, the knees are straightened. • Muscles: As the right foot comes forward, the dorsiflexors initiate this movement with the hamstrings and hip flexors contracting to lift and bend the leg and clear the ground in order to bring the right foot next to the left in one smooth, sweeping motion. Then, the quadriceps takes over to extend the knees bilaterally, to enable standing on both feet. The trunk stabilizers keep the spine stable and erector spinae elongates the spine in synchrony with the trunk stabilizers. The posterior chain as mentioned above stretches to allow uninhibited mobility into forward flexion. Hip flexors including iliopsoas, pectineus, sartorius, and rectus femoris contract to flex hip and rotate pelvis forward. • Breathing: In the final position of the ninth or ashwa sanchalanasana, you breathe in and hold. You may begin transitioning into the 10th pose or the hasta padasana or forward bend by breathing out. In the final phase of this pose, complete exhalation is performed which allows deepening of the pose. You may stay in this pose with 2-3 breath (in and out) cycles, deepening the pose and approximating the trunk to thighs each time you exhale. “Om Savitre namah” “I bow to Him who produces everything” 2017 is off to a wonderful beginning. Looking forward to continuing with the posts. As always, suggestions are welcome. Lets get on with the Surya namaskar.
The ninth posture (the left leg is in front and right leg behind) in Surya namaskar is similar to the fourth, (the right leg is in front and the left leg is behind), that is the equestrian posture. This is also called the ashwa sanchalanasana. • Posture: From the parvatasana or mountain pose, bring the left foot forward, between the hands with the left hip and knee bent as in lunge position. Extend the right leg back and plantar flex the right foot, so that the foot rests on the dorsum or top of foot (in the fourth posture, the right foot is up front and the left foot behind). Deepen the lunge and to enhance stretch in right groin this time, arch the back, while flexing the left hip as far as possible. Here the transition movement from the eighth to ninth posture is not as big as from the third to fourth and hence is relatively easier to achieve, gracefully. • Muscles: As you lower to the floor by bending (flexing) the left leg at the hip and knee joints, the psoas, pectineus, and hip flexor synergists as well as adductors and gluteus medius /TFL (medio-lateral stability) contract to keep the bending leg knee in line with the toes. The hamstrings contract at the left knee and dorsiflexors of the foot provide continued forward flexion of the knee and ankle joints. As always, the trunk stabilizers (transverse abdominus and multifidi) keep the spine neutral during the move. The extensor muscles of the right hip- the gluteus maximus, long head of biceps femoris, and the semimembranosus and semitendinosus- work in synchrony. The quadriceps extend the right knee and the plantar flexors (gastroc-soleus) contracts so the dorsum of foot comes in contact with the ground. If the pose is further deepened through trunk extension, the erector spinae contracts, and the latissimus and lower trapezius helps depress the shoulder blades with the palms open and hands firmly on floor. • Breathing: During the transition of posture from parvatasana to ashwa sanchalanasana, breathe in deep and long, even when you arch your back. This posture contains breathing in and out. In the final posture, chest is pushed out, arching the back, and so the anterior lobes of the lungs fill up with air in the alveoli for gaseous exchange. Breathe out as you hold the pose or transition to next posture. “Om Adityaya Namaha” “I bow to thee, who is God of gods.” Happy New Year!
The eighth posture in the Suryanamaskar is the Parvatasana or the mountain pose. Also, known as adho-mukh svanasana (downward facing dog). • Posture: Here you shift weight to the hands as you bring the pelvis off the floor first by flexing the hip and knees while the shin continues to rest on the floor. Next, dorsiflex the feet (bring the ball of feet under for weight bearing. To do this, you draw the feet towards the head, and plant the sole of the feet on the floor. Simultaneously, as you lift the knees and hips from the floor (the knees are straightened, albeit not locked or hyperextended), while the hands with palms facing floor form two of the four point support (the feet being the other two). The body makes an inverted “V” or a mountain shape with the sit- bones forming the highest point (ischial tuberosities form the “peak” of the mountain). The palms are still on the floor with fingers spread out, and elbows are extended while drawing the head between the arms, while gaze is fixed on the knees. To attain the final posture, push the heels into the floor and press into the palms through the shoulders, elongating the spine. This posture can be held for some time (1-3 minutes) and serves to even out breathing (you can do 2-3 cycles of breath in and out with holds in between). • Muscles: This posture is an excellent opportunity to stretch the posterior leg, especially the calf, the hamstrings and to some extent the gluteus maximus muscles the latissimus dorsi, back extensors and thoraco-lumbar fascia. The very first act is to stabilize the spine for the transition from bhujangasana to parvatasana. The muscles bracing the abdomen, keeping a stable and rotation-free torso are the transversus abdominus, obliques, multifidi. The quadratus lumborum with gluteus medius stabilizes or balances the pelvis laterally, with respect to spine and the hip joint respectively. Gradually the erector spinae contracts eccentrically with concentric contraction of rectus abdominus, permitting the spine to move from extension to neutral position. At the hip, the gluteus maximus is contracted in final bhujangasana position and it relaxes as it gives way to hip flexor engagement for closed-chain hip flexion. As the feet are pulled up in a weight bearing position and later the heels are pushed downwards into the floor, the dorsiflexors contract and in a closed-chain movement, they pull the shin (tibia or lower leg) forward and down, approximating them to the top of feet(dorsal surface). At the knee, the hamstrings engage briefly as they bend during transition movement and in final position the quadriceps tighten for knee extension pulling the knee cap upwards. One should be careful so as not to hyperextend the knee. Some weight is also transmitted via the upper extremities, requiring stabilization of the shoulder blades. The rhomboids and middle trapezius as well as serratus anterior bring the shoulder blade or scapula in close contact with the rib cage for added stability and effective weight transference. The rotator cuff, specifically the infraspinatus and teres minor rotate the humerus outward to prevent impingement at shoulder joint. The triceps bring the elbows to extension, then co-contracts with elbow flexors for stability and weight transfer. The pronators align the forearm so as to allow the palm to face down into the floor for weight bearing. The interosseous muscles in the hands bring the fingers apart to increase the base of support. • Breathing: During transition of posture from bhujangasana (cobra pose) to parvatasana (mountain pose), breathe out. Once in final position, breathe in and out several times to even out and deepen breath. In this position, the abdominal contents are pushing onto diaphragm due to gravity. At the same time, the rib cage is free and unimpeded in expansion all around. Breathe in deep and take opportunity to completely breathe out with aide from abdominal contents pushing on diaphragm effectively with less muscular engagement required. “Om Marichay Namaha” I bow to thee, one who possesses rays. Aah! And the year 2016 draws to an end as I write this last post for the year.
The seventh posture in the Suryanamaskar is the cobra pose or the bhujangasana. • Posture: From the eight-point salutation pose, extend the feet by pointing toes and resting the dorsum (top of foot) of the feet on the floor. Next lower the thighs onto the floor by bringing the hips to neutral from flexed position. The legs are resting on the floor from shin to thigh as you begin lifting the torso while extending the lumbar spine as you push the chest out. The spine should simultaneously stay elongated as you achieve a uniform curve, moving up towards mid and upper back. The palms facing down, resting on the floor are just behind the shoulders in the beginning and end up in front of shoulders as end posture is reached. The elbows may be in any degree of flexion to complete trunk extension, based on available range of spinal extension and trunk lift from the floor. Finally, you can push the palms into the mat as you open up the chest by rolling shoulder blades down and in. • Muscles: The plantarflexors in your legs (gastric-soleus and their synergists) facilitate pointing the toes or plantarflexion of the feet. An eccentric lengthening of the hip flexors with hip extensor contraction (gluteus maximus, biceps femoris and semitendinosus) ensures smooth lowering to the floor. It is important to pull in the navel to initiate the spinal movement with the transverse abdominals, obliques, and multifidi which stabilize the spine and then engage the erector spinae, latissimus dorsi and quadratus lumborum for lumbar and thoracic extension(stability before movement protects the spine). Sometimes if spine is stiff/weak it is not possible to arch the low back and in that case, one may use the arms to push-up and extend trunk. The rhomboids and middle trapezius bring the shoulder blades towards midline and maintain stability. The anterior chain muscles like the iliopsoas, rectus abdominus, pectorals and anterior deltoids are stretched with opening of the shoulders. Triceps facilitate weight transfer from upper arms via the extended wrists and flat palms on the floor). • Breathing: This is a classic backward bending posture and hence is accompanied with a deep breath in and hold at end of pose. This posture opens up the upper lobes of the lungs and one can notice the air rushing in to open the air sacs in the upper chest area. Inhale deep by availing the accessory muscles of breathing (in the neck), as they further elevate the upper ribs. “Om Hranyagarbhaya Namaha" I bow to thee, one who contains everything.  Happy Holidays! Let the festivities begin. The sixth posture in Surya Namaskar is the eight-point salute or the ashtanga namaskar. • Posture: From the four limb stick pose, slowly lower the knees to the floor. Then keeping the pelvis up and the hip in some flexion, lower the mid-point of upper chest (the top of sternum or manubrium sterni) to the floor, with the arms close to the torso. Next rest the chin on the floor while fixing gaze straight ahead. In this position, you are making an eight point contact with the floor/ground- the ball of feet(2), the knees(2), the two hands on floor(2), the top of chest(1) and the chin (1). • Muscles: The ankle dorsiflexors are already active with the peroneii for ankle stability as it bears weight. As you lower the knees from chaturanga dandasana, the hip and knee flexors (psoas, and rectus femoris at the hip, hamstrings and gastrocnemius at the knee) facilitate the movement, while the spine is kept in neutral by the spinal stabilizers ( transverse abdominus and multifidi). An important contribution comes from the popliteus which unlocks the knee to initiate flexion. Also, to keep the trunk in neutral rotation the obliques work symmetrically. Once the knees are resting on the floor in weight bearing position, major leg muscle groups co-contract in agonist-antagonist synergistic pattern to firm up the thigh like a pillar. The shoulder blades are drawn to the midline and stabilized by rhomboids, middle trapezius and serratus anterior as it pulls the scapula towards the ribs. The rotator cuff is active for shoulder joint stability, biceps/triceps synergize as the pronators and wrist extensors contract to allow the palm to contact the floor for weight bearing. • Breathing: As you transition from the four-limb stick pose to eight point salutation, breathe out gently and slowly. At end of posture, hold the breath out. The fifth posture in Surya namaskar is the chaturanga dandasana or the four limb stick pose.
• From the equestrian pose, bring the right foot back next to the left foot, keeping the arms extended at elbow and assume the plank position. The distance between the feet should be about 6-12 inches and no more than hip width apart. The entire body is like a straight stick, with four limbs in contact with the floor, hence the name four limb stick pose. The feet are dorsiflexed and resting on ball of feet, the knee and hip joints are neutral, the spine is neutral with neck elongated and shoulders directly over the wrist joints, with wrists in extension and weight bearing through palmar surface of hands. The entire trunk muscles work in co-contraction and there is complete synchrony of synergists, agonists and antagonists to maintain stability. From here maintaining stable trunk, slowly lower body as unit by keeping elbows close to trunk and bending the elbows, while shoulder joints are extended in close chain movement. As the body weight lowers, and the arms contribute to weight bearing, weight shifts to upper quadrant. The heels draw slightly forward to accommodate this weight shift and the ankle joints are at near 90° angle. This is the final chaturanga dandasana posture. It is important to keep spine in neutral and not hyperextend at the lumbar spine (inadequate spinal stabilization), which causes compensatory flexion of the thoracic spine with shoulder protraction or alternatively, the lumbar spine may be forced to hyperextend by hip flexion (tight muscles) with anterior pelvic rotation. Sometimes tight hip flexors with weak gluteus maximus may cause hip to flex and the ischial tuberosity to be higher than it should resulting in inverted “V” posture instead of stick pose. So be vary of any variation that may occur. • Muscles: The toe extensors and foot dorsiflexors are engaged, as are the quadriceps and gluteus maximus. To maintain stability of legs in the transverse plane, the abductors and adductors co-contract. Plenty of muscles are activated in the trunk to maintain stability as the rectus abdominus co-activates with the gluteus maximus to prevent anterior pelvic rotation and hence hyperextension of lumbar spine. The transverse abdominus, multifidi, and erector spinae are all active and the quadratus lumborum with the obliques balances the pelvis(maintains symmetry) and prevents unilateral pelvic rotation (or dipping of the pelvis on one side). The rhomboids and middle trapezius keep the scapula or shoulder blades close to the midline/ spine and provide the ideal channel for weight transference. The serratus anterior fires making load transfer from stable shoulder blades to the arms. The rotator cuff(set of muscles- supraspinatus and infraspinatus, subscapularis and teres minor) stabilizes the shoulder girdle and keeps the head of the humerus (upper arm bone) snug in the glenoid socket of the scapula (shoulder joint). Triceps contract as do the forearm pronators and wrist extensors with wrist in 90° of extension as the hands make contact with the ground. That is a long list of muscles activating to maintain a stable position. A wonderful workout and hence important to make sure you are comfortable doing it. In yoga Patanjali says “sthiram sukham asanam,” which means the “stable comfortable posture,” and this posture can amply demonstrate this if one tunes into (or increases awareness of the comfort level of the body during its performance. It is important to experience comfort during execution of this posture. Stop at once if you notice discomfort or unease in your back, shoulders or wrists or any other body part. It may indicate the need to work on stability of isolated parts or simplifying posture by decreasing intensity through bringing knees to floor and building up missing or weak components. • During transition from the ashwa sanchalanasana to the chaturanga dandasana, breathe out. When you reach the final posture and hold the posture, breathe in and hold breath in. Alternatively if you cannot hold for that long, inhale and exhale as long as you can, finishing up with inhalation. Breathe in slow and prolong breaths as you can. In yoga, much benefit takes place through prolonged holding of postures and breath for stability and quicker pace has more to do with skill or ease of movement. "Om Khagaya Namaha" I bow to thee, one who moves in the sky |
Details
AuthorAmi Gandhi is a licensed physical therapist in the state of California. She is the owner of StableMovement Physical Therapy, a small boutique practice in San Jose that offers patient centered, one-on-one, hands-on physical therapy. Archives
March 2018
Categories |
